Step-by-step guide to modern, secure and Open-source CI setup


For modern application development, it is very important to deliver changes to the online environment as quickly as possible. This allows product owners to see and test the integrity of evolving products and provide feedback to the development team quickly, gaining a lot of money on earlier improvements.
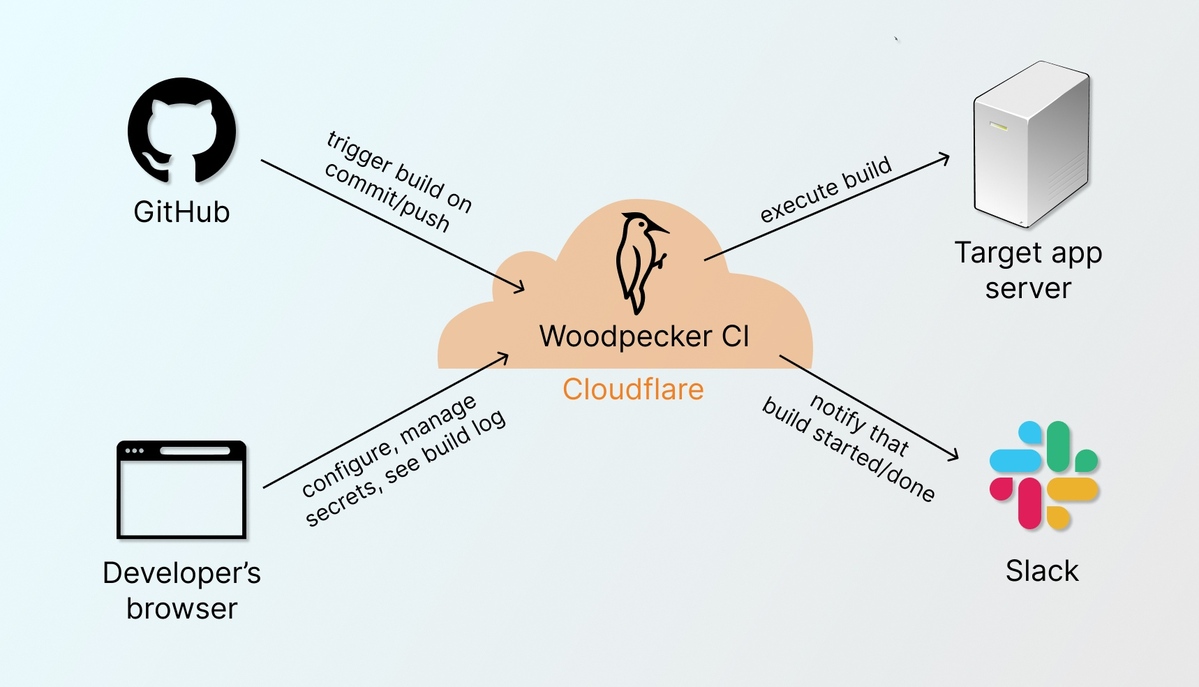
Today we are going to show you easy professional steps to setup continuous integration flow using Woodpecker CI, GitHub, Cloudflare and Slack!
Motivation and tools
CI is a must-have for Agile methodology and Scrum tasks management. When you have automated CI flow you can maintain environments tied to repository branches. For example, one of the most elite and most advanced usages is branch sandboxing. Let's say you have a branch called feature/analytics-page and your web app is hosted on domain myapp.io, with branch sandboxing you will be able to deploy this branch to analytics-page.myapp.io with a simple git commit/push. Even if you don't want to deploy branches online you might apply this approach to run unit tests on a branch to allow/deny merge.
No matter which deploy system you use – whether it be Docker, Serverless framework, Ansible, Kubernetes or plain script with Secure Shell command – you can make it run automatically each time you push changes to your git repository.
On early project phases we recommend to split environments by several branches. dev, staging, and live. This will allow developers to always push locally tested changes to dev (or make pull-requests from branches to dev), and then progressively move changes to live.
To make this compatible with most projects and technologies, in this post we will stick to:
- GitHub – repository hosting provider, in terminology of CI systems called forge
- Woodpecker CI – CI system with a web dashboard which will run the build script (pipeline) for each of your projects. It must be hosted on some cheap Virtual Private Server (VPS), which we will call the build server.
- Cloudflare [Optional] - allows you to hide your CI server behind the secure CDN which protects it from various attacks
- Slack [Optional] – work messenger which we will use to see notifications about the build process (build started/build finished).
Why Woodpecker CI?
Drone vs woodpecker
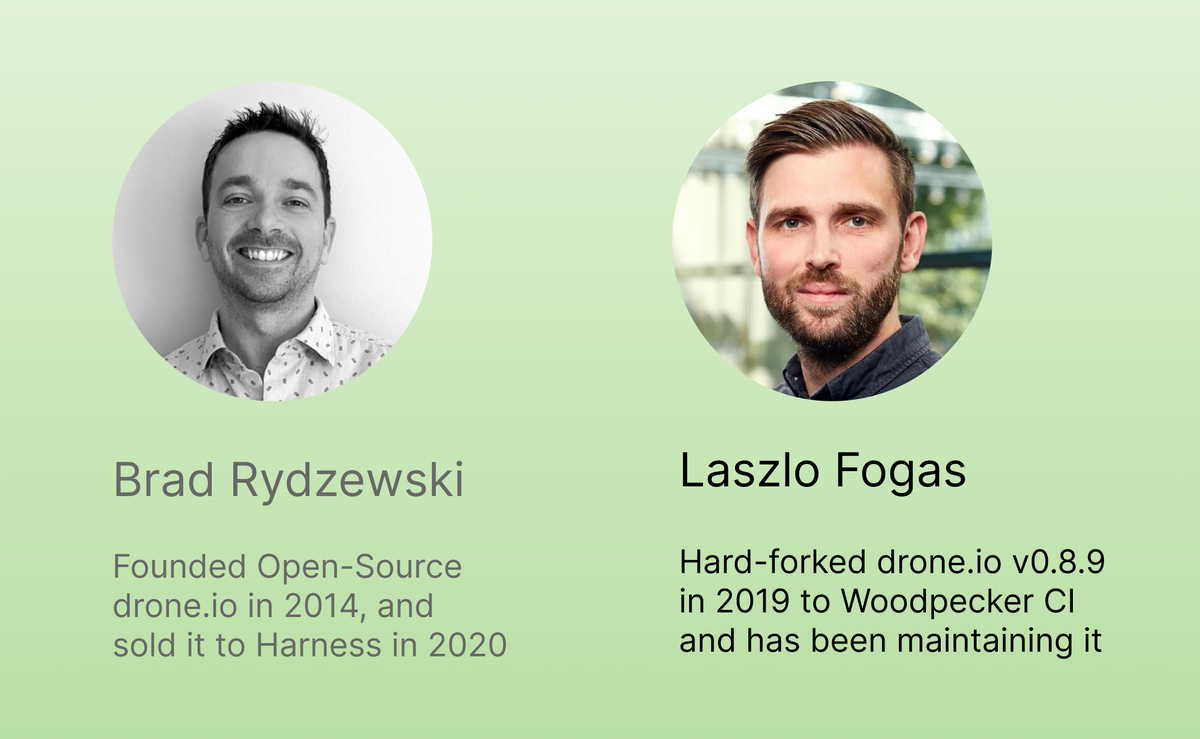
Woodpecker CI is a community fork of the great Drone.io project founded and implemented by Brad Rydzewski. In Aug 2020 Drone was acquired by company called Harness. After acquisition Drone.io became absolutely awful: Harness assigned extra-huge price, much greater then average prices on CI market: for now the minimal plan is $25 per developer per month for both cloud and self-hosted versions, with only ability to pay yearly 💩
Also acquisition has born a lot of uncertainty and confusion. Official Drone website still exists and confuses users, when actual pricing moved to buyer website. At the same time it seams that Drone.io continues to ship free open-source community edition with cut-out needed features: you have no repository secrets, no Cron jobs, you can't connect build agents, your pipeline is limited.
Considering the facts above we must conclude that Drone.io project has gone. Forever. There is nothing to compare here.
Good news that Drone.io openness and license before acquisition allowed to fork it at the moment before it was commercialized, so this is how Woodpecker CI was born. And nowadays Woodpecker CI gives us all Drone-s features for free and forever 🎉! You just self-host it in your own server and it works!
Woodpecker vs other CI systems
We were very upset when Drone.io project has gone. Anyway we continued using Drone.io for a some time but one great day we discovered a well-supported OSS fork! We moved our projects there instantly.
Main benefits of both Drone.io and Woodpecker CI are:
- They have very simple UI which in most cases does absolutely all that you need. When you use Woodpecker or "dead" Drone CI you feel like “it is software which has small number of features, but they are exactly what I need”. Like Uber, Glovo or Air-BNB: one button which solves your needs. The UI is so simple that you might feel it is not enough. But it is. And it is really easy to get started, you don't need to learn it. It just builds and shows you progress. After using it you forget about overcomplicated set of laggy unneeded elements and pages in Jenkins like about nightmare.
- Build Pipeline is based on pure Docker and described in YAML file which is stored in repository. Any kind of software or tooling or environment with a specific version could be added within minutes and could be tested locally. You can integrate any APIs just by using curl docker image, or AWS cli image for interacting with AWS.
- Same as Drone, Woodpecker manages all privileges in the right way based on OAuth access to upstream forge (e.g. GitHub). You don’t need to spend hours Googling guides and installing vulnerable external plugins like in Jenkins and then updating them.
- Both Drone and Woodpecker are written on Golang. RAM consumption footprint is much smaller then in old-school Java-based Jenkins. Whole performance of UI and builds is great.
Points 1-3 are also the same for many commercial CI systems nowadays like GitHub Actions. So here are True benefits of Woodpecker CI compared to other non-open-source tools:
- Zero price for CI tool: no pain with billing. It will be always free without any limitations, you don't need to be afraid that one day your CI service will increase a price or you will exhaust some build-minutes limits (e.g. once you will need to run a lot of E2E tests on CI). And you will never be vendor-locked on commercial CI features. Even if now Woodpecker CI might be not richest one in terms of features you can invest your time in adopting it (which this post will help you with) and it will give you calm and stable future.
- Customizable build hardware. You can select the hardware on which you want to build your pipelines depending on your need. You can balance between hardware price and it's cost. You can run as many build agents as you need and parallelize your builds. You can use any kind of architecture, e.g. ARM, when commercial CIs most likely will allow you to build only on x86. To start you can select very cheap like $10/month VPS and self-host Woodpecker CI as described in this post. In the future, you will be able to easily move your installation to a new server or spawn a new agent.
- Data safety. You can always review source code of CI system to make sure it does not leak your data.
- Extensibility. You can apply a PR with some extra-rare feature which you very need. Also, there is a great chance that the feature that you need is already implemented by someone else and waiting in PR, so you can help with this PR or just go and vote for it to speed-up the process.
- Full autonomy and compatibility with self-hosted forges. Some of our clients have a sensitive codebase that is never shared with any external services like GitHub. So by following agreements all their infrastructure including build tooling should be self-hosted. We are using the client’s hardware and spawn open-source software there. Woodpecker CI plays well with self-hosted forges like Gitea and GitLab
At this point I hope you already want to get your hands dirty and test this Woodpecker CI by yourself. Let's do it!
Installing Woodpecker on your VPS server
To host Woodpecker CI we need to get a VPS with SSH access and public IP. To provision our build server we will use Docker, which allows a very quick setup of all required software and provides the ability in the future to recover a build server state with all software very quickly.
We will use the simplest Amazon EC2 t2.micro instance (1 GiB RAM). It is free for new AWS accounts for first year and affordable after the first year at ~10$/month (price may slightly vary depending on region). Instead of Amazon EC2, you can use any VPS hosting service.
1. Sign In/Sign Up into AWS console https://aws.amazon.com/. For better ping select an AWS region closer to you, e.g. we used Europe Frankfurt.
2. Go to Services → EC2 → Instances (find in the left menu). Click Launch Instance.
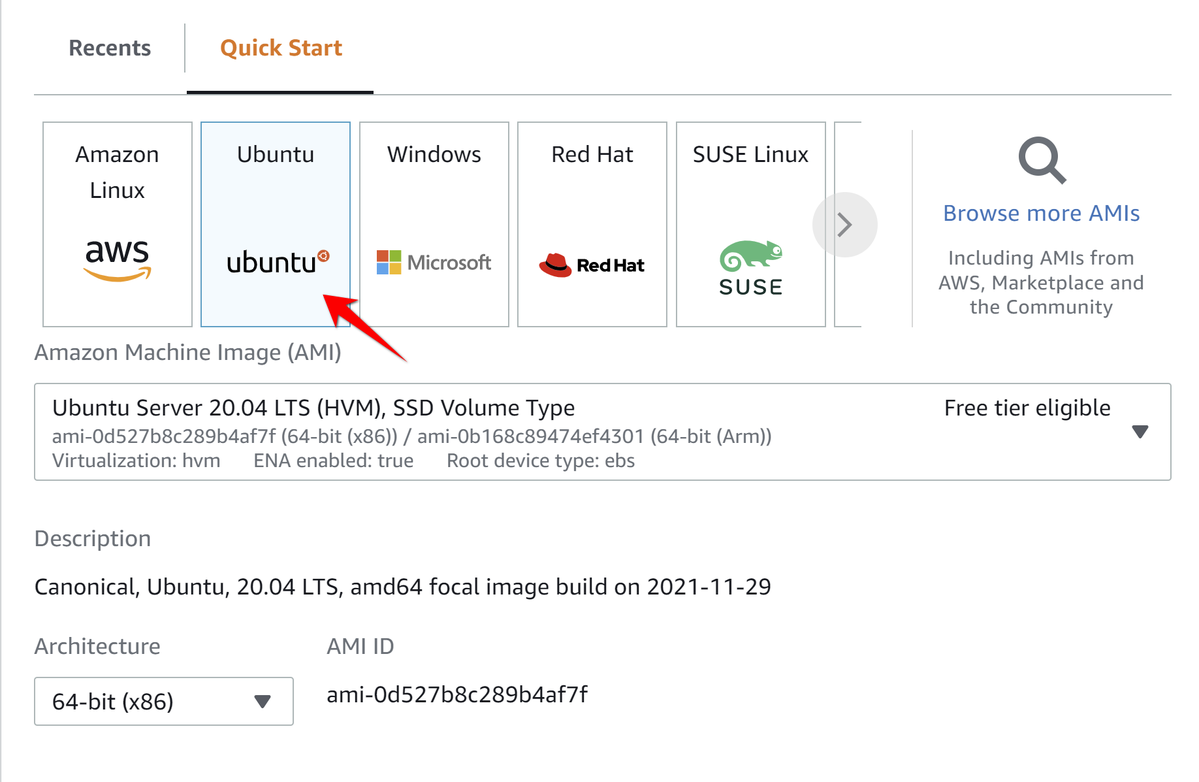
Select Ubuntu in Quick Start menu:
3. On Instance type step select t2.micro. On Key Pair step select Create new key pair:

Enter Key Pair name and select ED25519 key pair type.
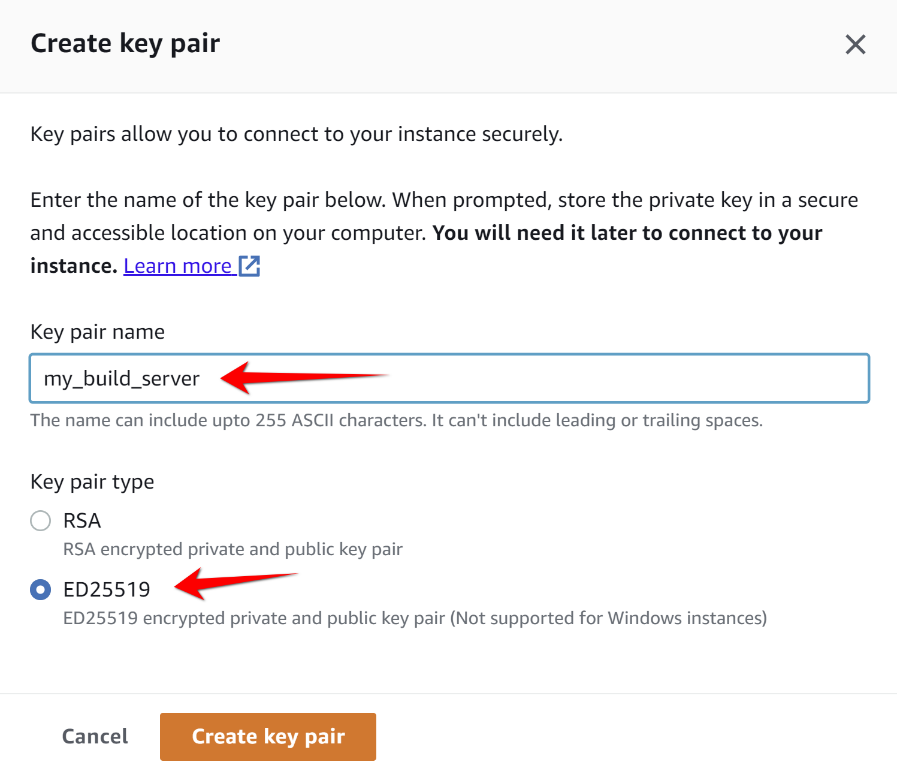
After clicking Create key pair button you should get .pem file which will be used later to connect to instance.
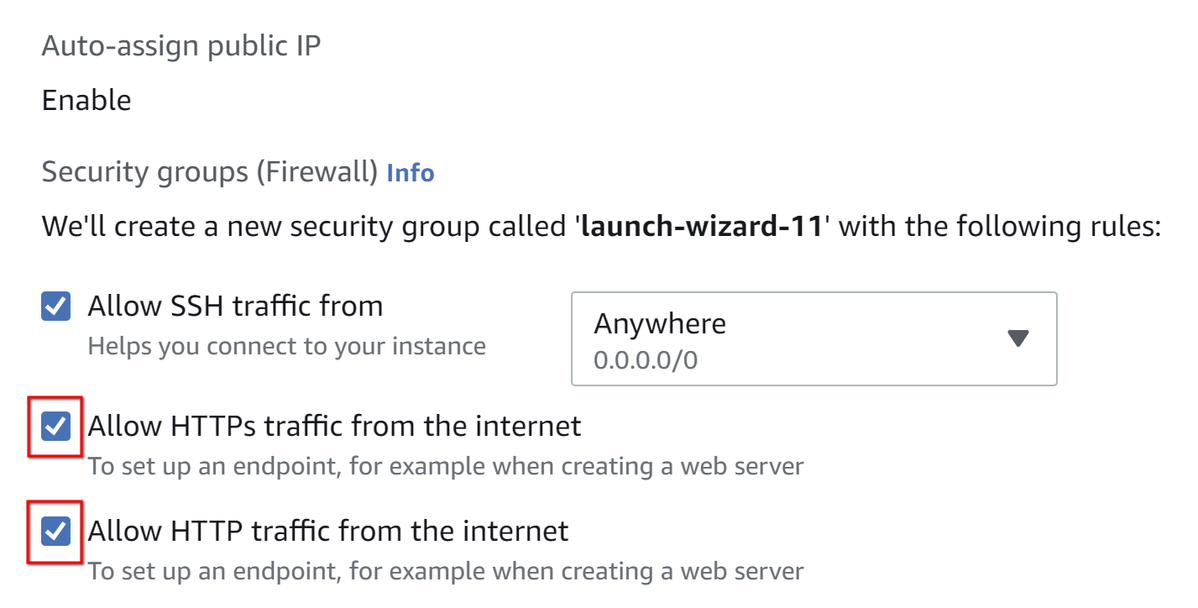
4. Tick options to open SSH, HTTP, HTTPs ports on your instance:
5. Click Launch Instance.
6. Now we need to add fixed static IP address so it will be persisted in case if you will want manually rebut instance.
Go to Services → EC2 → Elastic IPs and click Allocate Elastic IP address and then Allocate.
7. Click on the checkbox on the left side of the IP item you've just created, and click on Actions → Associate Elastic IP address to associate the IP address to EC2 instance.
8. Choose an instance and its private IP and click Associate. Great! You have static IP mapped to your instance.
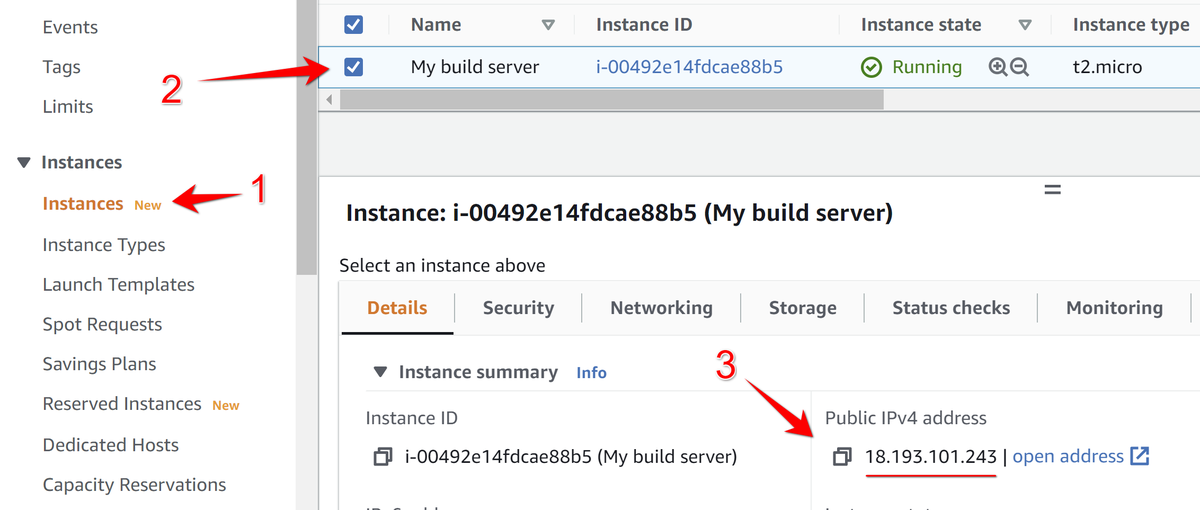
9. Return to the list of instances and click on instance Details to verify IP address:
Now we have to get a domain for our Woodpecker instance.
Option 1: Use your a subdomain on your own domain as it is nice and more secure (with free Let's Encrypt https certificate).
You might want to configure the subdomain in your company/own domain for a build server. This automatically generates a built-in Let's Encrypt SSL certificate (feature included in WoodpeckerCI container) so your WoodpeckerCI will work over https.
For this, you only have to get a domain, such as mycompany.com and then in the DNS setup of your domain just add one A record with a name e.g. build, which will point to the IP of our instance (in my case it is 18.193.101.243). So your Woodpecker Dashboard will be hosted on build.mycompany.com.
For example, I will use build.devforth.io, so I will add DNS record of A type to IP address of my instance (On screenshot above). So I will add this record using DNS dashboard of my domain:
TYPE  NAME            VALUE
A     build.devforth.io      18.193.101.243
Option 2: Less secure (http) using Amazon public domain instead of subdomain on own domain
If you don't have your own domain or access to its DNS settings, the simplest solution will be using the built-in Public DNS domain of your instance provided by Amazon. Go to EC2 Instance details again and find Public IPv4 DNS:
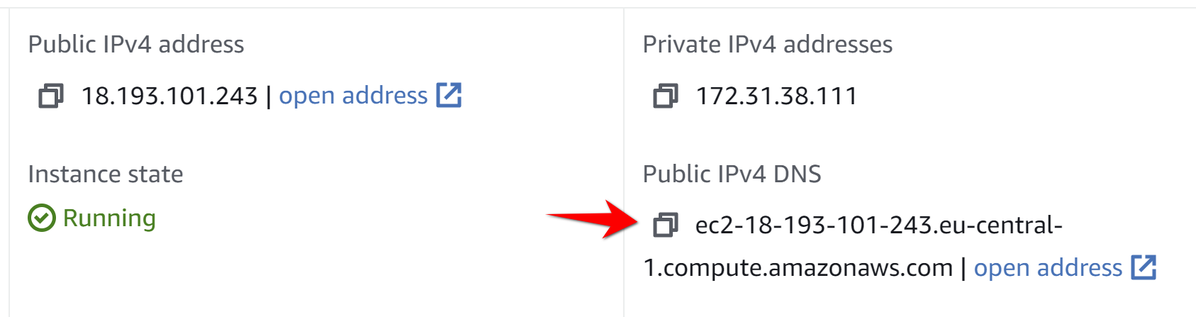
This endpoint can be used with the HTTP URL scheme but you will not be able to use https on it because Let's Encrypt will not generate HTTPS certificate for *.amazonaws.com subdomains
Provision your VPS with Woodpecker
1. Using command line, navigate to the directory with a downloaded key my_build_server.pem, move it to home (or another preferred dir) and change permission to the file by running the following commands in a terminal:
mv my_build_server.pem ~/my_build_server.pem
chmod 700 ~/my_build_server.pem
On Linux/MacOS you can use a native terminal emulator, while on Windows 10/11 we recommend using WSL 2 Ubuntu (or at least Git Bash).
2. Connect to EC2 instance with SSH:
ssh -i ~/my_build_server.pem ubuntu@18.193.101.243
Instead of 18.193.101.243, use IP address of your server. Now you should see the Ubuntu prompt in a terminal.
3. Now we need to install Docker software. To use latest stable Docker version we recommend commands from official Docker setup guide:
sudo apt update -y && sudo apt install -y ca-certificates curl gnupg lsb-release
curl -fsSL https://download.docker.com/linux/ubuntu/gpg | sudo gpg --dearmor -o /usr/share/keyrings/docker-archive-keyring.gpg
echo \  "deb [arch=$(dpkg --print-architecture) signed-by=/usr/share/keyrings/docker-archive-keyring.gpg] https://download.docker.com/linux/ubuntu \  $(lsb_release -cs) stable" | sudo tee /etc/apt/sources.list.d/docker.list > /dev/null
sudo apt update -y && sudo apt install -y docker-ce docker-ce-cli containerd.io
4. Install docker-compose:
sudo curl -L "https://github.com/docker/compose/releases/download/1.29.2/docker-compose-$(uname -s)-$(uname -m)" -o /usr/local/bin/docker-compose && sudo chmod +x /usr/local/bin/docker-compose
5. Clone our Woodpecker CI Docker Compose template and copy .env.sample to .env:
git clone https://github.com/devforth/woodpecker-compose-template.git
cd woodpecker-compose-template/
cp .env.sample .env
6. Open .env in any CLI editor (e.g. nano .env) and fill all variables:
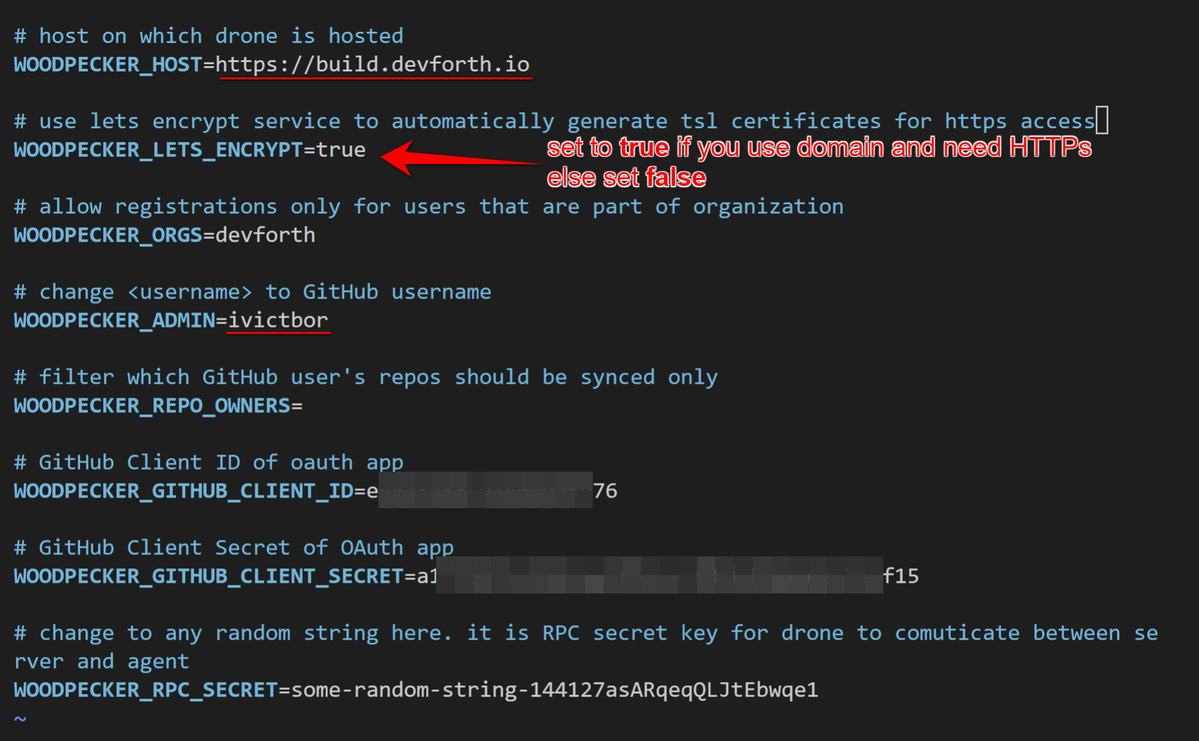
To get WOODPECKER_GITHUB_CLIENT_ID and WOODPECKER_GITHUB_CLIENT_SECRET you need to create GitHub application:
7.1. Go to Developer settings
7.2. Click Register a new application.
7.3. Set Homepage URL to a domain on which Drone will be hosted:
- If you have a domain it will be: https://build.mycompany.com
- If you use Amazon public domain it will be something like http://ec2-18-193-101-243.eu-central-1.compute.amazonaws.com (in this case you can only use HTTP scheme in URL)
Set Authorization callback URL to Homepage URL + /login. See an example carefully:
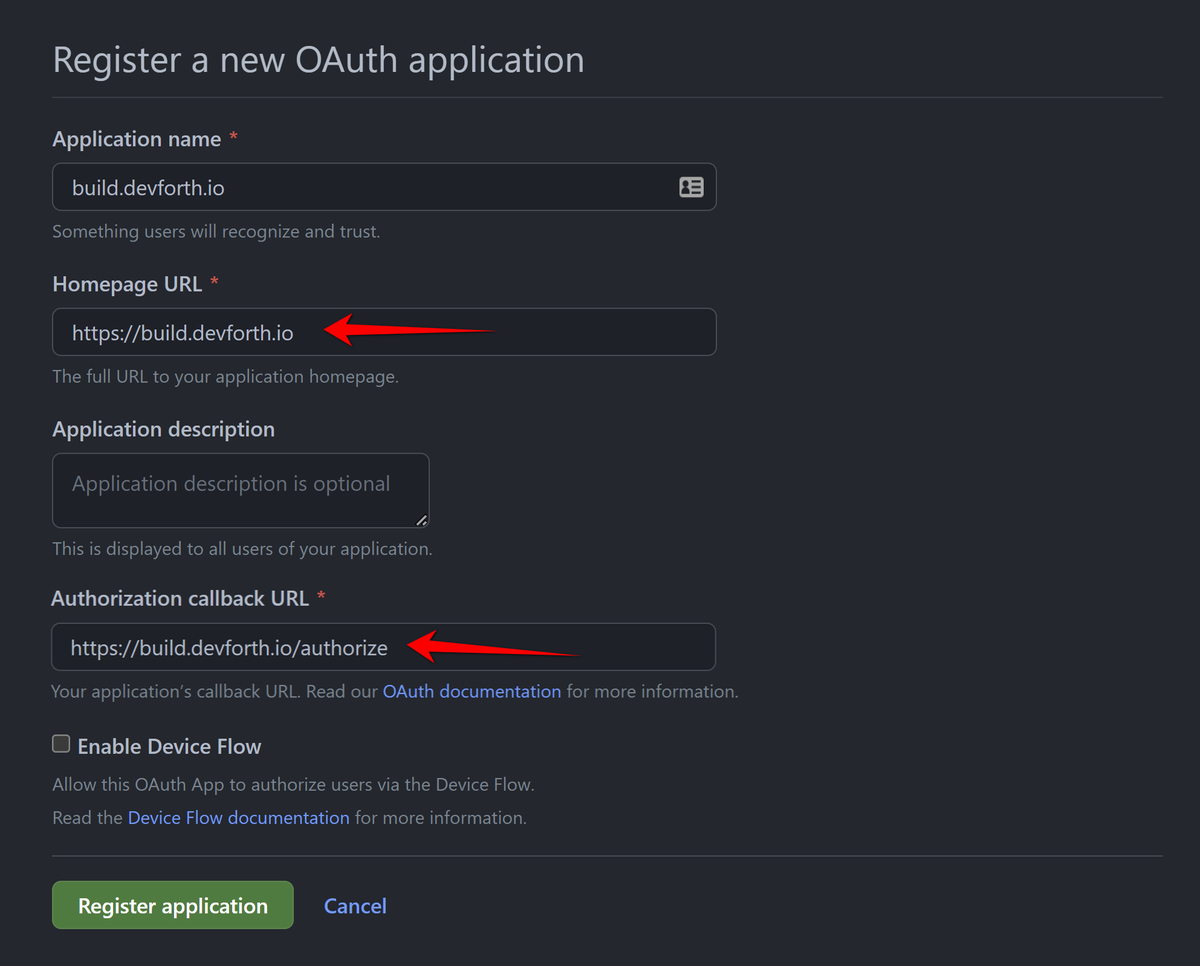
7.4. After you create an application you will see Client ID. Client Secret should be generated with button click. Copy them to your .env file and save them.
8\. Create an account on https://hub.docker.com/ and run
docker login
Enter credentials from signed up user. It will help you to bump DockerHub images pull limit, or pay for Dockerhub if it will be needed. Anyway now you only need to create an account and log in here.
9. Now run:
sudo docker-compose up --build -d --force-recreate
After it is finished you should be able to go to your domain, e.g. https://drone.mycompany.com or http://amoazon-dns-domain.
📒 To debug build output you might want to start it without -d flag which detaches containers output
📒 To view logs of Woodpecker web server use sudo docker logs woodpecker-compose-template_woodpecker-server_1
📒 Just in case if you want to stop containers run sudo docker-compose down
10. Upon going to https://drone.mycompany.com you should be redirected to GitHub OAuth authorization. After you complete authorization you should see your repositories (it can take some time to sync up with GitHub).
Woodpecker CD/CI minimal project configuration
As an example, I will show you the building of a very simple project with one sh file which does an echo. You can just create a fork into your account from this one.
Go to Woodpecker, click Add repository, then click Reload repositories, find your repo and Activate it by clicking Enable.
If you can't find repository, scroll down to section "How to allow others to add repository to Woodpecker"
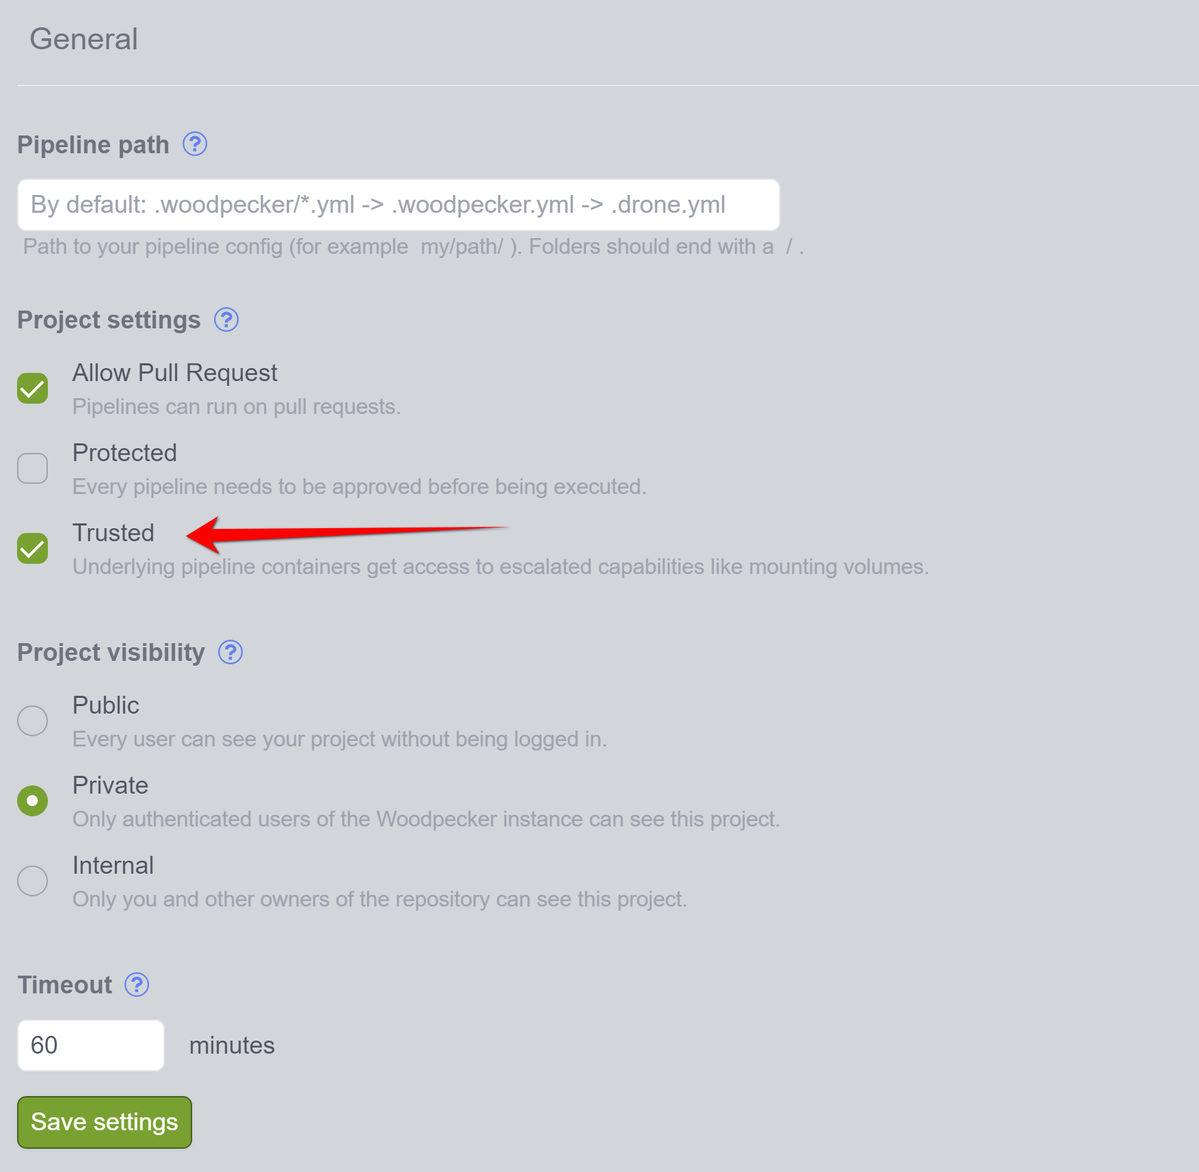
Now go to settings:

Set Trusted option and save:
Now in your repo create a configuration file .woodpecker.yml with the following content:
clone:
  git:
    image: woodpeckerci/plugin-git
    settings:
      partial: false
      depth: 5

steps:
  build:
    image: docker
    volumes:
      - /var/run/docker.sock:/var/run/docker.sock
    commands:
      - cd deploy && /bin/sh build.sh
This runs our sh file. Simply push the file and Woodpecker CI will automatically start building your project!
And we are done, you can go to build lock and check output of our target:

And it works!

Here we just printed couple of lines and substituted branch and commit SHA environment variables, however you can do any if you need see a complete list of woodpecker environment variables.
Protecting your Woodpecker installation with Cloudflare
Optionally you can also very easily set a Cloudflare on free plan in front of your VPS server. Why:
- To hide your web-server real IP address (Instead Cloudflare will use own). No one will be able to attack / poke your ports.
- Add basic protection layer from DDoS attacks.
- Speed up loading of Woodpecker Dashboard a little bit, because Cloudflare is caching distributed CDN by it's nature
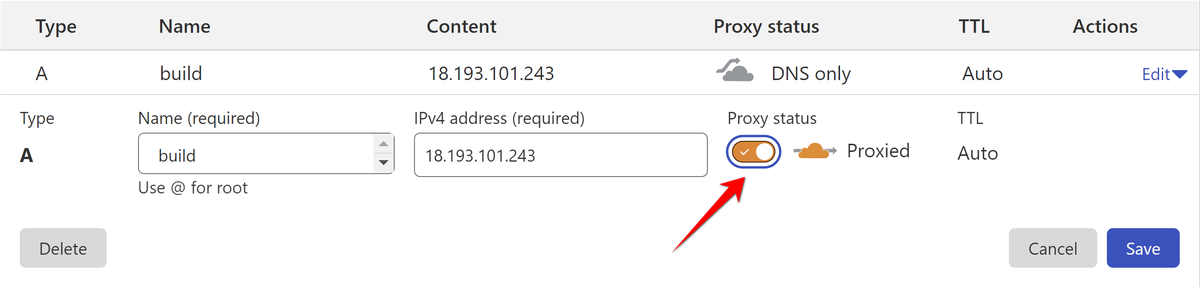
Cloudflare works only if you have your own domain. Just Sign Up to Cloudflare and follow initial site setup guide. This will include repointing NS records of your domain to Cloudflare DNS servers. From this moment all DNS control should be done in Cloudflare. Old DNS server will not be used.
If you are new to Cloudflare, for all your records you can set Proxy status to DNS only. For Woodpecker you can safely set Proxied to activate protection:
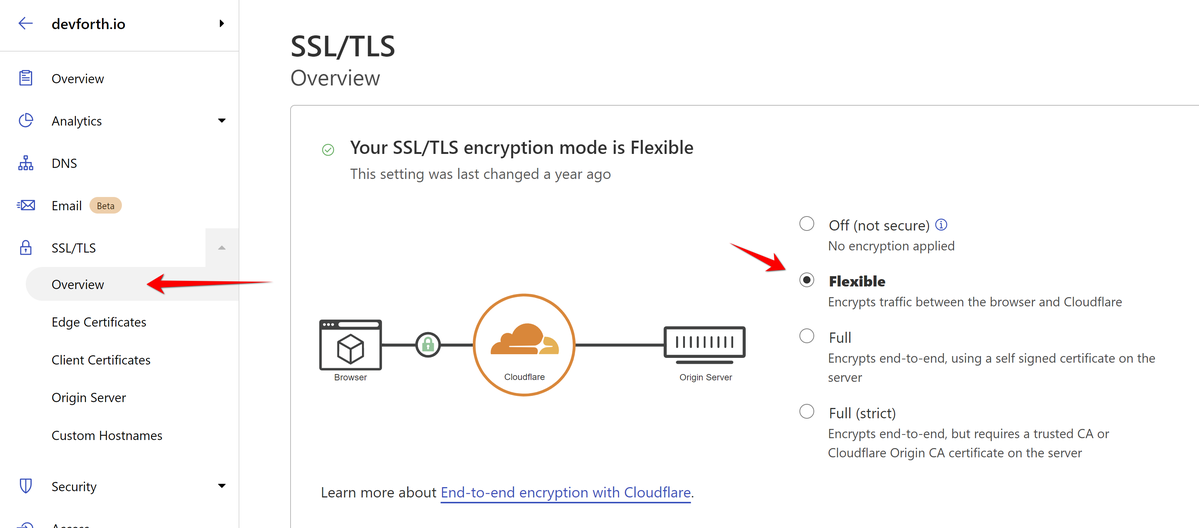
Also we need to set a way Cloudflare connects to your server. For most compatible setup we will explain how to use Flexible mode, which means Cloudflare will use plain HTTP (80) requests to your server:
Now it is also very important to set WOODPECKER_LETS_ENCRYPT option to false in .env and restart container with updated .env:
sudo docker-compose up --build -d --force-recreate
If you will not do this, then Woodpecker will always answer to Cloudflare with 301 redirect from HTTP to HTTPs (Cloudflare Flexible Option forces to make HTTP requests). So in the end you might get Infinitive redirects loop (Browser might show it as ERR_TOO_MANY_REDIRECTS).
📒 It takes some time for Proxy status to take affect. Sometime it is slowed down by DNS cache. To easily check whether you are under cloudflare or not, check HTTPS SSL Certificate Issuer: if it is CN=R3 O=Let's Encrypt then certificate is served from your server and you are not under Cloudflare
🛡️ For best level of protection you should never expose your IP address to anyone (in my case 18.193.101.243). I did it here only for content-writing purposes and will destroy server before post will be publishedAlso you should keep Cloudflare proxied status forever, because once you will disable it, your IP address will go to DNS servers list
How to allow others to add repository to Woodpecker
Person configured in WOODPECKER_ADMINS option can add repositories by default. What if you want to allow your teammates to add some repositories to CI?
First of all you need to make sure that person who will add a repository has an Admin role in repository settings on GitHub:
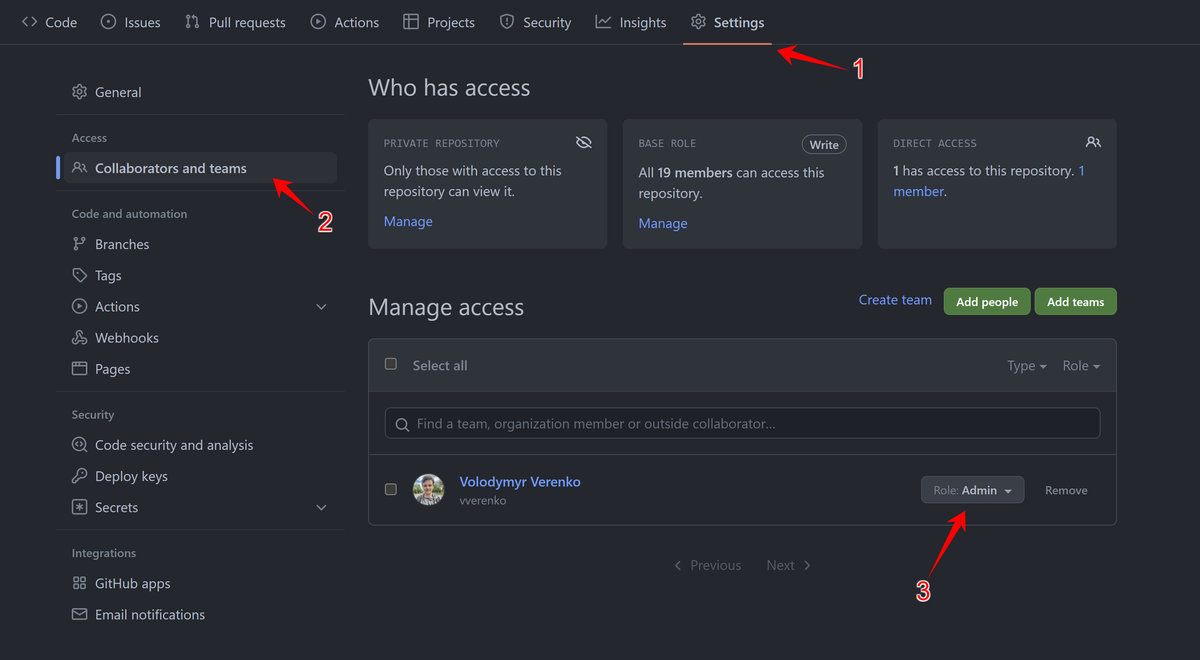
Then user should go to Woodpecker, click Add repository button (top right corner), then click Reload repositories, wait, then find repository which has your project and click Enable. Then you need to create .woodpecker.yml file, example could be found this the hint: How to create automatic docker-compose-based deploy pipeline
☝🏼 In same way GitHub Admin role allows users to change secrets. So if a new member needs to make changes in project Secrets or other Woodpecker configuration, then you have to give him Admin role inside of GitHub repository settings and tell him to click Reload repositories
Slack Integration into your build flow
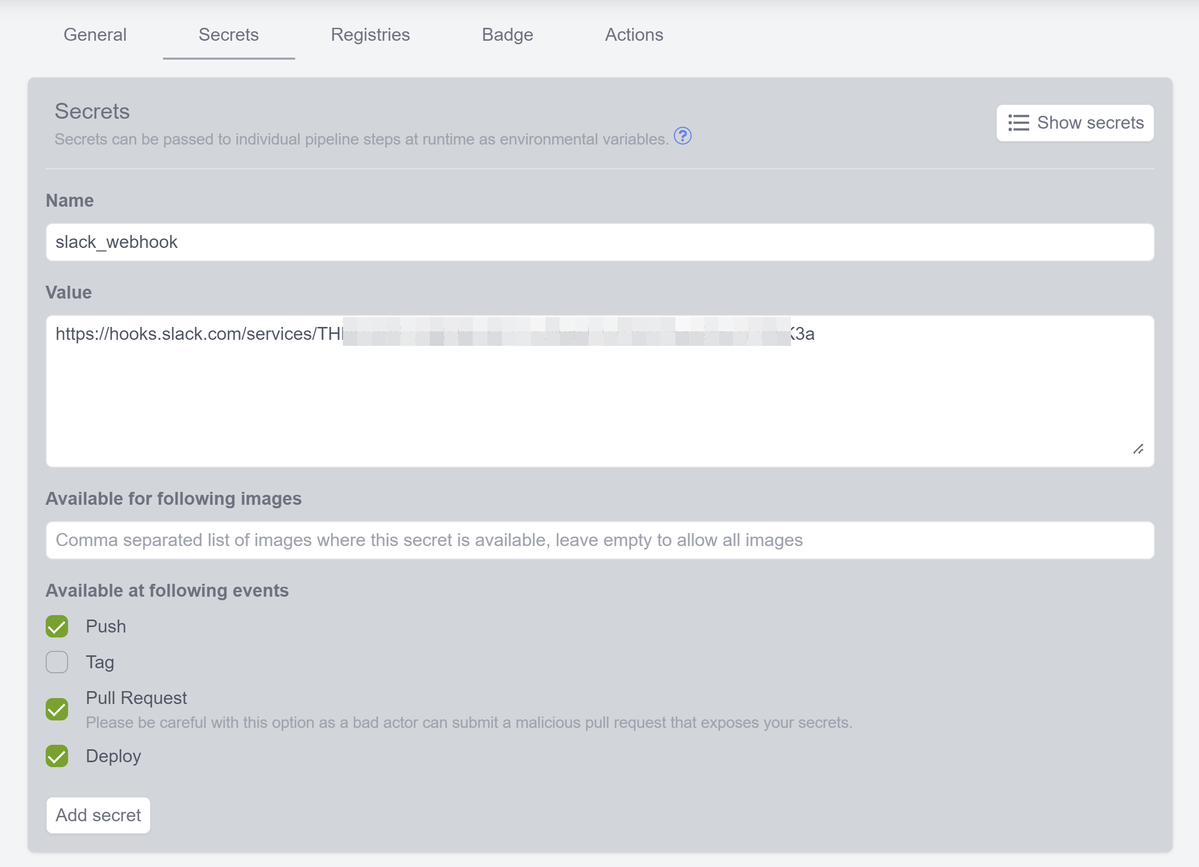
First, we have to add a webhook to the desired channel so Woodpecker can send messages to it: simply visit https://app.slack.com/services/new/incoming-webhook, choose your workspace in the top right corner, select desired channel and click on Add. Copy webhook URL.
Slack webhook is a sensitive value because it can be used to post into a Slack channel. That's why it has to be stored inside of Woodpecker and not in the repository source code, as it minimizes the number of people who can access it. In Woodpecker these sensitive variables are called Secrets. Go to project settings and add slack_webhook:
Now you need to add a step after the build step to .woodpecker.yml, so whole file looks like this:
clone:
  git:
    image: woodpeckerci/plugin-git
    settings:
      partial: false
      depth: 5
pipeline:
  build:
    image: devforth/drone-builder
    volumes:
      - /var/run/docker.sock:/var/run/docker.sock
    commands:
      - /bin/bash build.sh

  slack-after-build:
    image: plugins/slack
    secrets:
      - slack_webhook
    webhook: $SLACK_WEBHOOK
    username: Woodpecker CI
    icon_url: ${CI_COMMIT_AUTHOR_AVATAR}
    template: >
      {{repo.name}}/{{build.branch}} - #{{build.number}} {{uppercasefirst build.status}} after {{since build.started}} (<{{build.link}}|Open>)
    when:
      status:
        - success
        - failure
And push change. You will see a note after build is done:

As you can see to use Secret you just have to specify from_secret: <secret name>. This works for all values inside of .woodpecker.yml.
You can customeize your message using template parameters. For more parameters and template references visit the plugin documentation page.
After the build, you should see a message in the desired channel.
If you want to receive a message at the start of build, you can also add a similar step before build.