OnLogs – open-source simplified web logs viewer for Dockers


Throughout our development journey, we utilized various log aggregation tools, including self-hosted solutions like ELK Stack, Grafana Loki, Fluentd, and Prometheus. We observed that these tools have a complex configurations and maintenance requirements, demanding substantial server resources like CPU and RAM. Additionally, we employed cloud-hosted tools such as DataDog. However, these have drawbacks, such as the risk of exposing sensitive information to third parties, imposed limits, and recurring monthly fees.
Over the years, we pondered: Why can't the log viewer tool be straightforward and lightweight? Imagine a compact Docker image, just a tiny thing listening on a web port, boasting a user-friendly front end, lazy scrolling, the ability to perform full-text searches, clear old logs, and filter lines by severity.
Finally, a year ago, we turned our dream into reality and began using it. We deployed OnLogs on multiple projects, some in active development and others already in production. We addressed critical issues along the way, and now, after a year of practical experience, we're excited to share it with you.
Here is OnLogs on GitHub. What is it:
- Coded on GoLang and Svelte.js - final Docker Image is less then 15 MiB!
- OnLogs Could be deployed simply as docker container (see compose minimal example below in this post)
- View logs of any docker container produced by container into STDOUT
- Text insensitive/sensitive search across all logs
- See time of appearance of any log time in local time or UTC
- Highlight JSON elements in log text
- Automatic severity detection by log level (by searching for indicator words like WARN/Warning in line) and statistics on how many lines with each severity is there
- Ability to clean up logs
- Supports hosting on subdomain or path prefix and routing using any HTTP proxy (Traefik/Nginx)
Want to try it quickly?
- Username: admin
Demo server and domain
For temporary demo purposes, we acquired thedemoapp.xyz domain using NameCheap for $2 (renewing after a year is expensive, so be careful with cheap domains).
Also for same purposes we rent a EC2 server in AWS:
- Services → EC2 → Instances → Launch an instance
- Name and tags: TheDemoApp (any your name, used in AWS only to label the server)
- Application and OS Images: Ubuntu Server 22.04
- Instance Type: t2.micro (Free tier eligible, good option for experimenting)
- Key Pair → Create key pair → Key pair type: RSA → Private key file format: .pem, Create key pair. Download .pem file
- Network settings: Allow SSH traffic from, Allow HTTPS traffic from the internet, Allow HTTP traffic from the internet
- Configure storage: 8 GiB, gp2
- Launch instance
- Wait some time for initialization.
- Return to EC2 Instances, click on instance, and note Public IPv4 address. In my case, it is 3.70.226.79
- On the same instance click on Security, then click on Security Group (blue link), Edit Inbound Rules, Add rule, Port range: 2376, Source: 0.0.0.0/0. This port is used for docker deployments, we will secure it with TLS. Save rules.
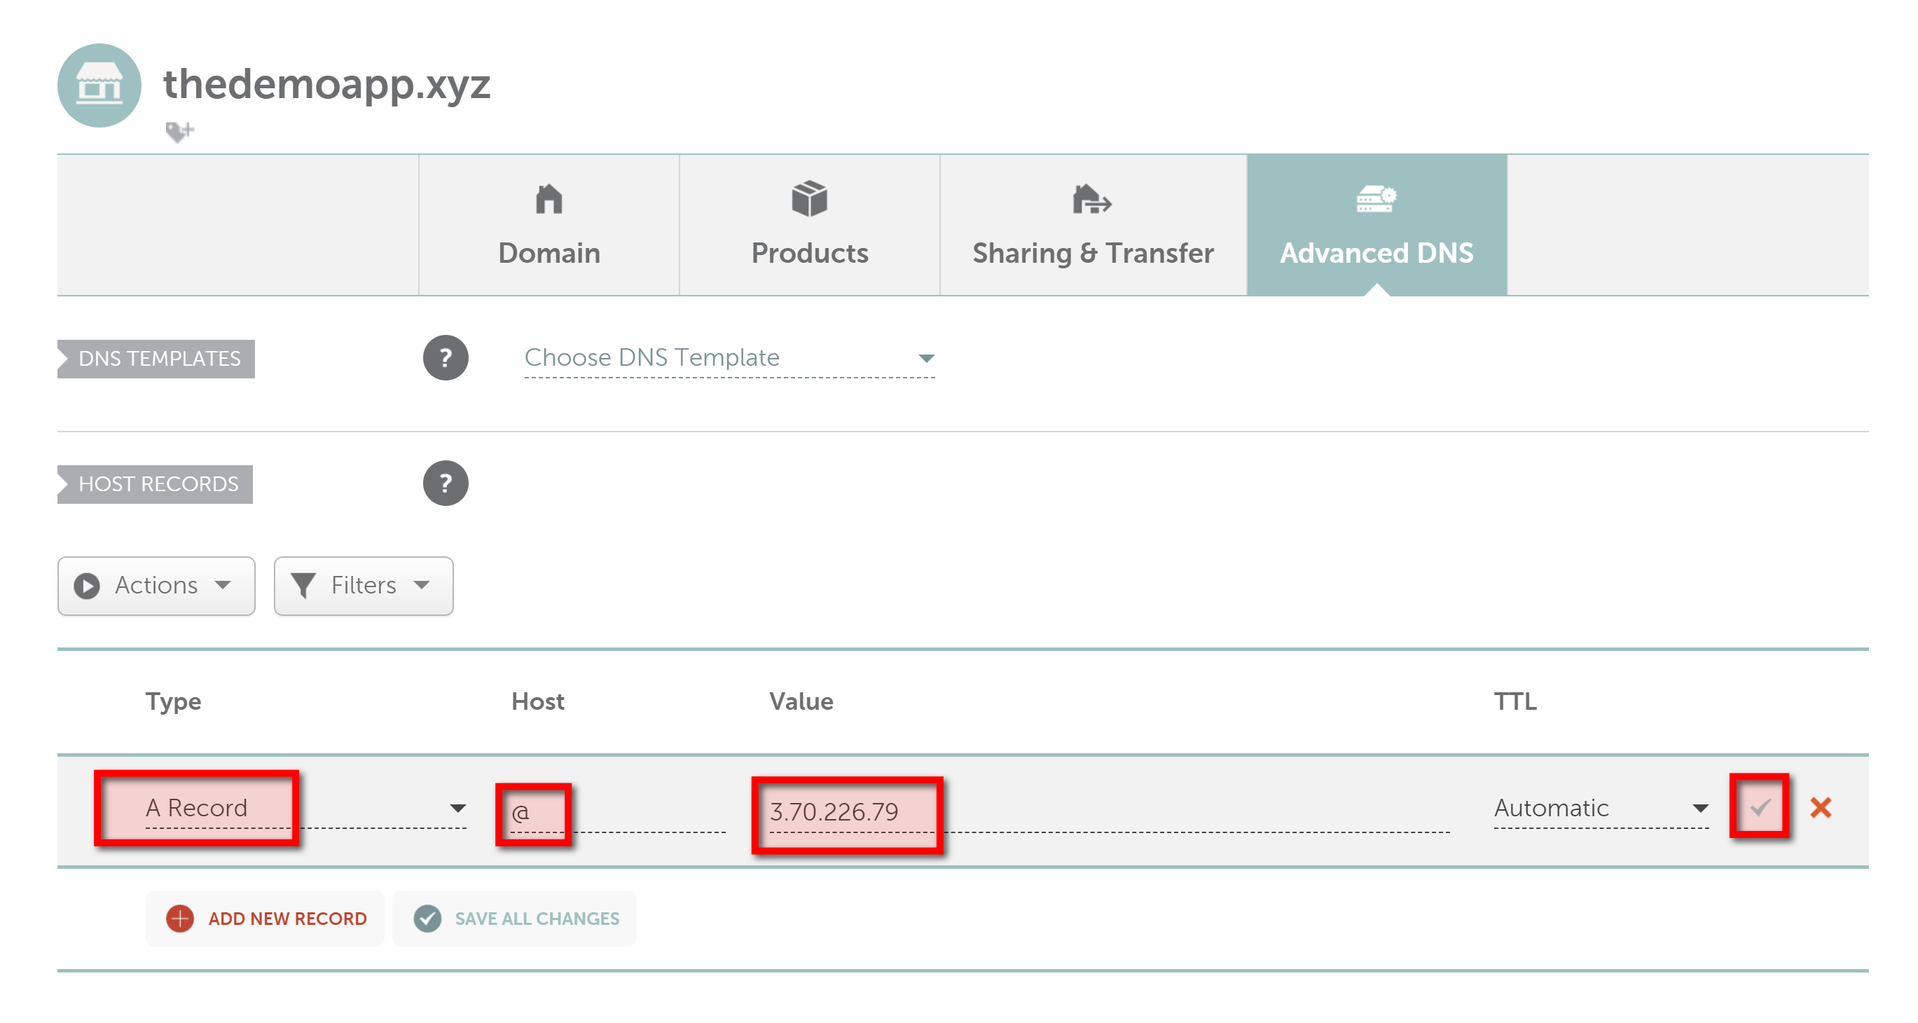
Now we should point domain to to public IP address on our server in Namecheap dashboard:
- Go to Namecheap dashboard.
- Click MANAGE button at right side of domain.
- Click Advanced DNS.
- Remove existing records, and add new ones with Type A Record, Host: @, Value: public IP address of the server from AWS. Click the check icon to apply changes (Easy to forget to do it and lose the changes😀)
Now we will connect to server using key given by AWS:
chmod 600 ~/keys/TheDemoAppKey.pem
ssh ubuntu@3.70.226.79 -i  ~/keys/TheDemoAppKey.pem
We should enter a server terminal. We always recommend using automated commit-triggered CI with a secure secrets vault for production projects. But here, we will use a very simplified way of deploying from a local PC using a simple .sh script.
We have to install Docker daemon and is to generate TLS certificates on server for deployment:
sudo apt update && sudo apt install docker.io
sudo bash
curl -s -L https://raw.githubusercontent.com/devforth/docker-tls-generator/main/generate-tls.sh | bash
The command above crrated 3 mandatory certificate files in ~/.docker directory, and we will use cat to copy content from each of them.
Below we will post a content of a .sh file. There, instead of placeholders like <⚠️VAULT_MAIN_CA_PEM_KEY> copy text content from every file:
- Placeholder:
<⚠️VAULT_MAIN_CA_PEM_KEY>. Valuecat ~/.docker/ca.pem - Placeholder:
<⚠️VAULT_MAIN_KEY_PEM_KEY>. Valuecat ~/.docker/key.pem - Placeholder:
<⚠️VAULT_MAIN_CERT_PEM_KEY>. Valuecat ~/.docker/cert.pem
Add next content into deploy.sh file:
#!/bin/bash

set -e

HOST_DOMAIN=3.70.226.79 # ⚠️ replace with public IP address of your file


VAULT_MAIN_CA_PEM_KEY=$(cat <<-EOF
-----BEGIN CERTIFICATE-----
<⚠️VAULT_MAIN_CA_PEM_KEY>
-----END CERTIFICATE-----
EOF
)

VAULT_MAIN_KEY_PEM_KEY=$(cat <<-EOF
-----BEGIN PRIVATE KEY-----
<⚠️VAULT_MAIN_KEY_PEM_KEY>
-----END PRIVATE KEY-----
EOF
)

VAULT_MAIN_CERT_PEM_KEY=$(cat <<-EOF
-----BEGIN CERTIFICATE-----
<⚠️VAULT_MAIN_CERT_PEM_KEY>
-----END CERTIFICATE-----
EOF
)


mkdir -p ./certs/

echo "$VAULT_MAIN_CA_PEM_KEY" > ./certs/ca.pem
echo "$VAULT_MAIN_KEY_PEM_KEY" > ./certs/key.pem
echo "$VAULT_MAIN_CERT_PEM_KEY" > ./certs/cert.pem


# Activate remote Docker contest on the Application server (so all next docker commands executed on the server)
export DOCKER_HOST=tcp://$HOST_DOMAIN:2376
export DOCKER_TLS_VERIFY=1
export DOCKER_CERT_PATH=./certs/

docker compose -p stack-thedemoapp -f docker-compose.yml up -d --pull always --build --remove-orphans --wait

# cleanup
docker 2>/dev/null 1>&2 rmi $(docker images -f "dangling=true" -q) || true
Now create a docker-compose.yml file and add the specification of the resources:
version: '3.8'

services:
  traefik:
    image: "traefik:v2.5"
    command:
      - "--api.insecure=true"
      - "--providers.docker=true"
      - "--entrypoints.web.address=:80"
      - "--entrypoints.websecure.address=:443"
      - "--certificatesresolvers.myresolver.acme.httpchallenge=true"
      - "--certificatesresolvers.myresolver.acme.httpchallenge.entrypoint=web"
      - "[email protected]" #  ⚠️ replace with your email
      - "--certificatesresolvers.myresolver.acme.storage=/letsencrypt/acme.json"
    ports:
      - "80:80"
      - "443:443"
    volumes:
      - "/var/run/docker.sock:/var/run/docker.sock:ro"
      - "./letsencrypt:/letsencrypt"
    labels:
      - "traefik.http.middlewares.redirect-to-https.redirectscheme.scheme=https"
      - "traefik.http.routers.http-catchall.rule=hostregexp(`{host:.+}`)"
      - "traefik.http.routers.http-catchall.entrypoints=web"
      - "traefik.http.routers.http-catchall.middlewares=redirect-to-https"
      - "traefik.http.routers.http-catchall.tls=false"

  whoami:
    image: "containous/whoami"
    labels:
      - "traefik.enable=true"
      - "traefik.http.routers.whoami.rule=Host(`thedemoapp.xyz`)" # ⚠️ replace with your domain
      - "traefik.http.routers.whoami.tls=true"
      - "traefik.http.routers.whoami.tls.certresolver=myresolver"
      - "traefik.http.routers.whoami.priority=1"    command:
      - --verbose

  onlogs:
    image: devforth/onlogs:latest
    restart: always
    environment:
      - ADMIN_USERNAME=admin
      - ADMIN_PASSWORD=H#4po3jj45! # ⚠️ replace with your OnLogs password
      - PORT=8798
      - ONLOGS_PATH_PREFIX=/onlogs
    labels:
      - "traefik.enable=true"
      - "traefik.http.routers.onlogs.tls=true"
      - "traefik.http.routers.onlogs.tls.certresolver=myresolver"
      - "traefik.http.routers.onlogs.rule=PathPrefix(`/onlogs`)"
      - "traefik.http.services.onlogs.loadbalancer.server.port=8798"
      # priority
      - "traefik.http.routers.onlogs.priority=2"
    volumes:
     - /var/run/docker.sock:/var/run/docker.sock
     - /var/lib/docker/containers:/var/lib/docker/containers # if you want to delete duplicating logs from docker
     - /etc/hostname:/etc/hostname
     - onlogs-volume:/leveldb

volumes:
  onlogs-volume:

networks:
  default:
    driver: bridge
Run deploy file:
bash deploy.sh
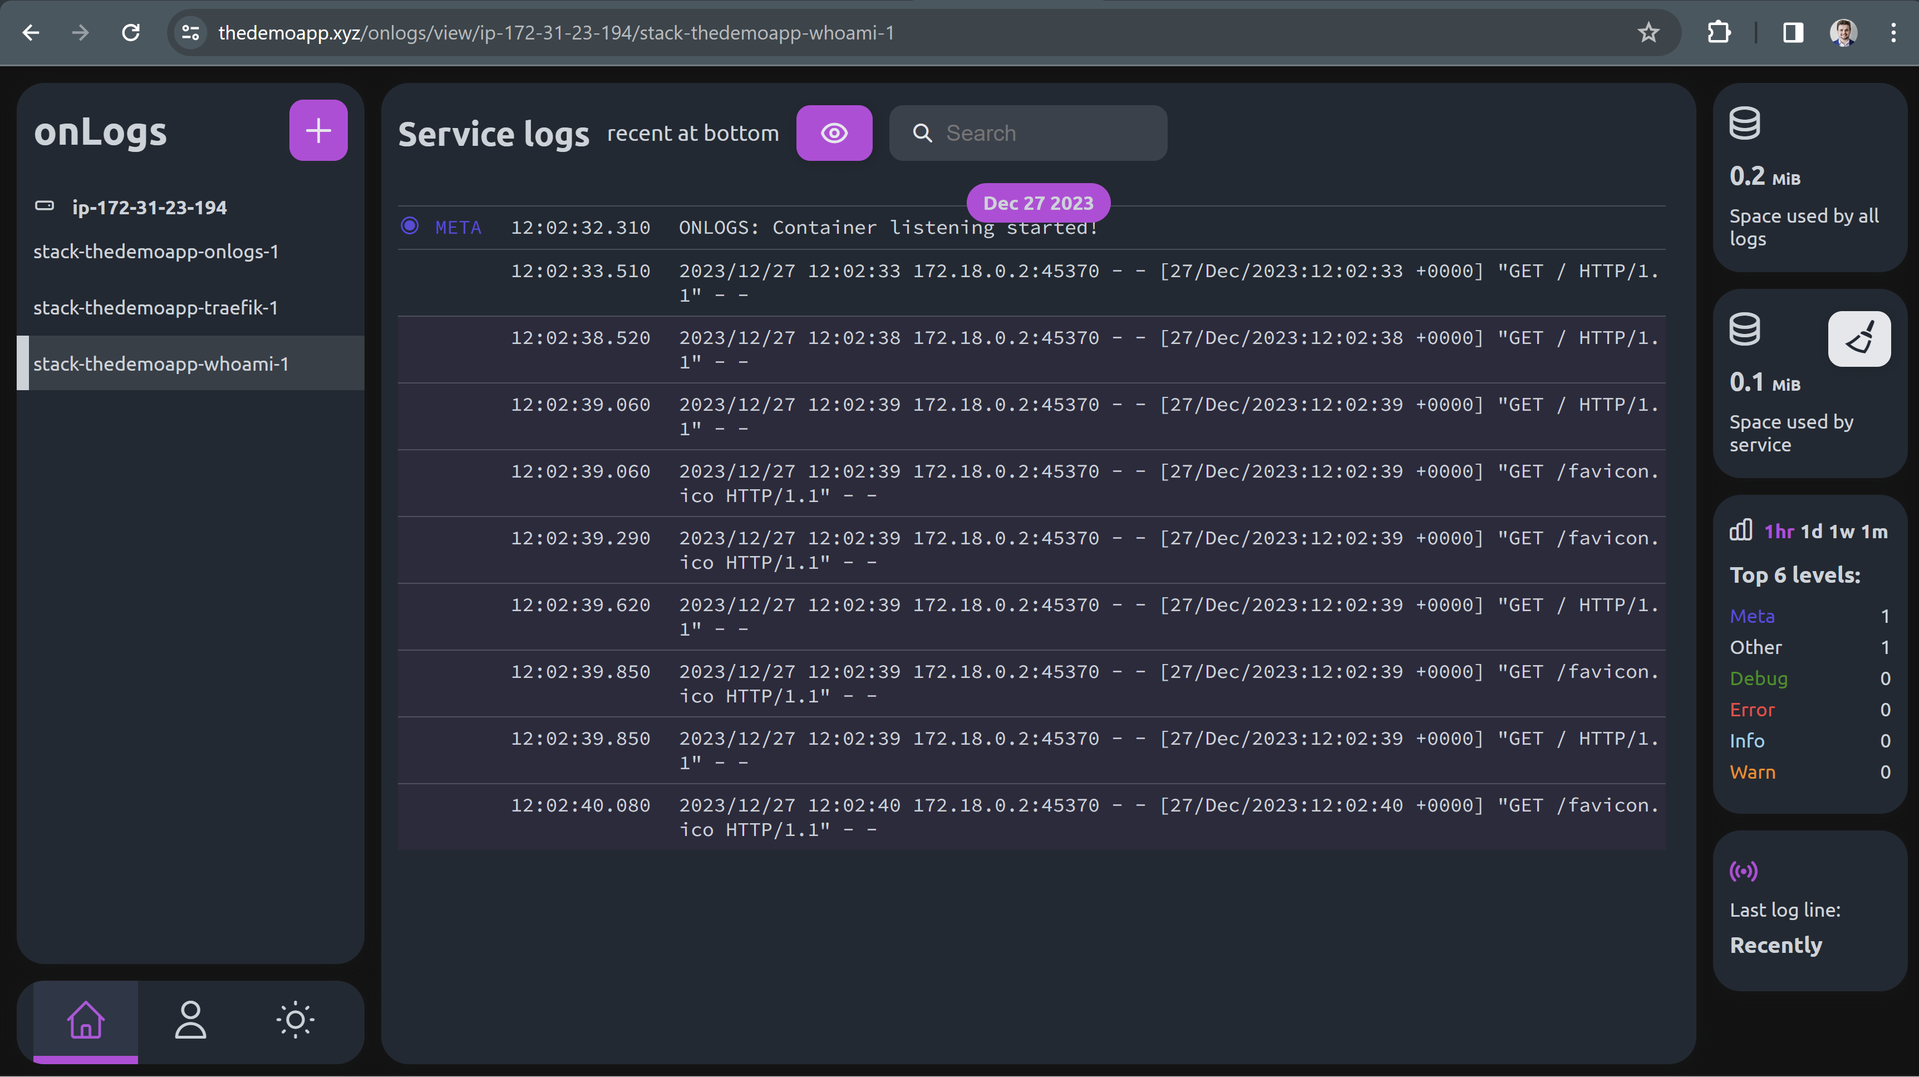
On the https://thedemoapp.xyz/ we can see WhoAmI webserver responses.
The OnLogs itself is hosted on https://thedemoapp.xyz/onlogs. Basic credentials are:
- Username: admin
- Password: H#4po3jj45!
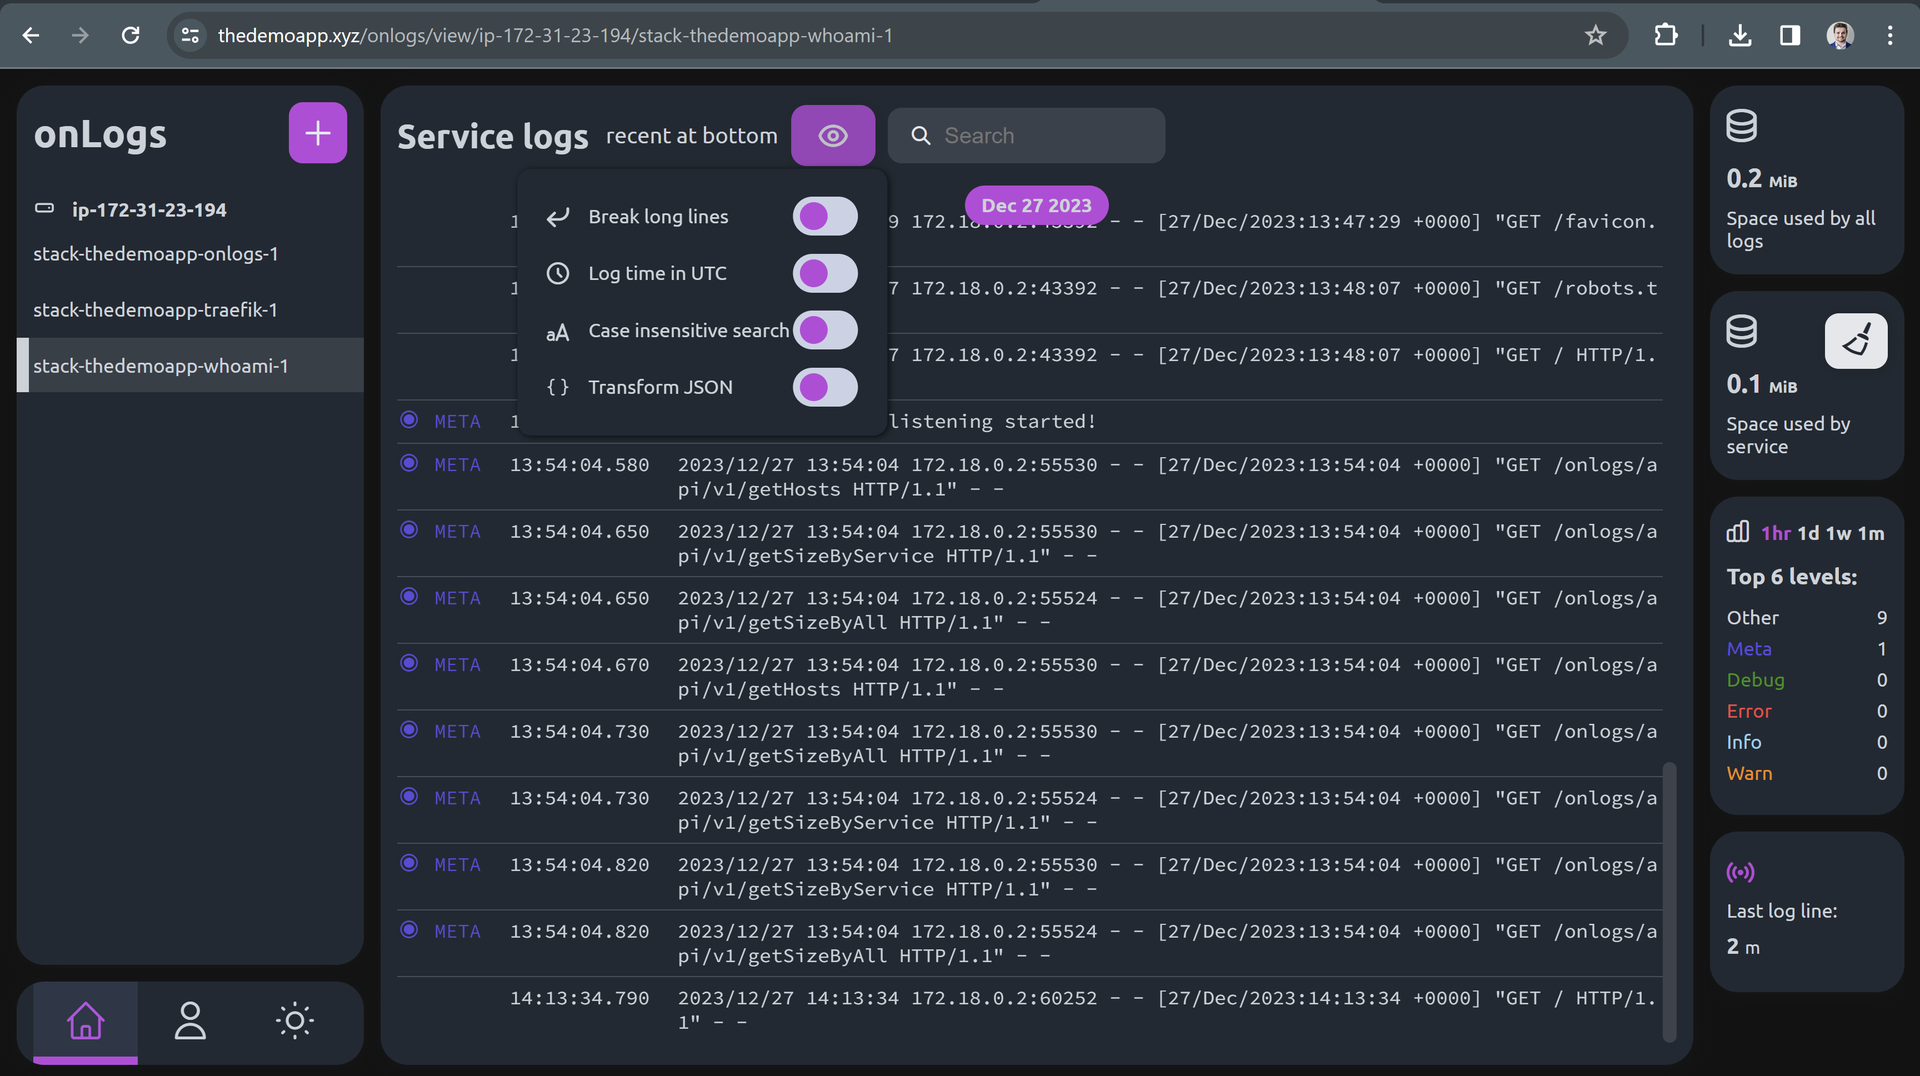
The options which affect look of log lines are available under Eye dropdown:
Conclusion
In summary, OnLogs is our answer to the need for a simple, small and efficient log viewer. It's designed to tackle the complexities of traditional log management tools without the heavy resource demands. Having proven its effectiveness in various projects, we're thrilled to offer OnLogs to the wider community. Give it a try and experience a streamlined approach to log management.