Dookerized deploy setup using Woodpecker CI and Harbor registry

The setup described in this post requires a self-hosted open-source Woodpecker CI build server, and Harbor docker registry served on subdomains with SSL certificates (SSL could be implemented with Cloudflare). We host both on one VPS machine because the Docker registry utilizes a different subset of resources than the build server, though you can also host on different machines.
Described CI stack has next features:
- Allows you to build Docker images on the build server without utilizing application server resources (RAM, CPU), so your runtime is safe from build side effects.
- You can utilize tiny and cheap servers for your application services and have one powerful build server by removing the need to have extra resources on the application server just to perform builds. Better spend budget on having a dedicated server for QA/UAT environments, with a common configuration.
- All tools in setup are open source so you don't need to pay for CI or for Docker registry - just pay for VPS server hosting. For small projects which has no requirements for high build-time capacity and docker registry volumes difference in price might be not noticeable but even in this case it will allow you to make sure SAAS vendors will not raise price at random point or commercialize a free service, and also that you will not fit vendor resource limit at time when you will scale.
- Vendor SaaS independence also reduces the number of points which could leak your code. Fewer points of trust are better.
New project setup flow
Setup Harbor repository
Go to:
https://harbor.yourdomain.com/
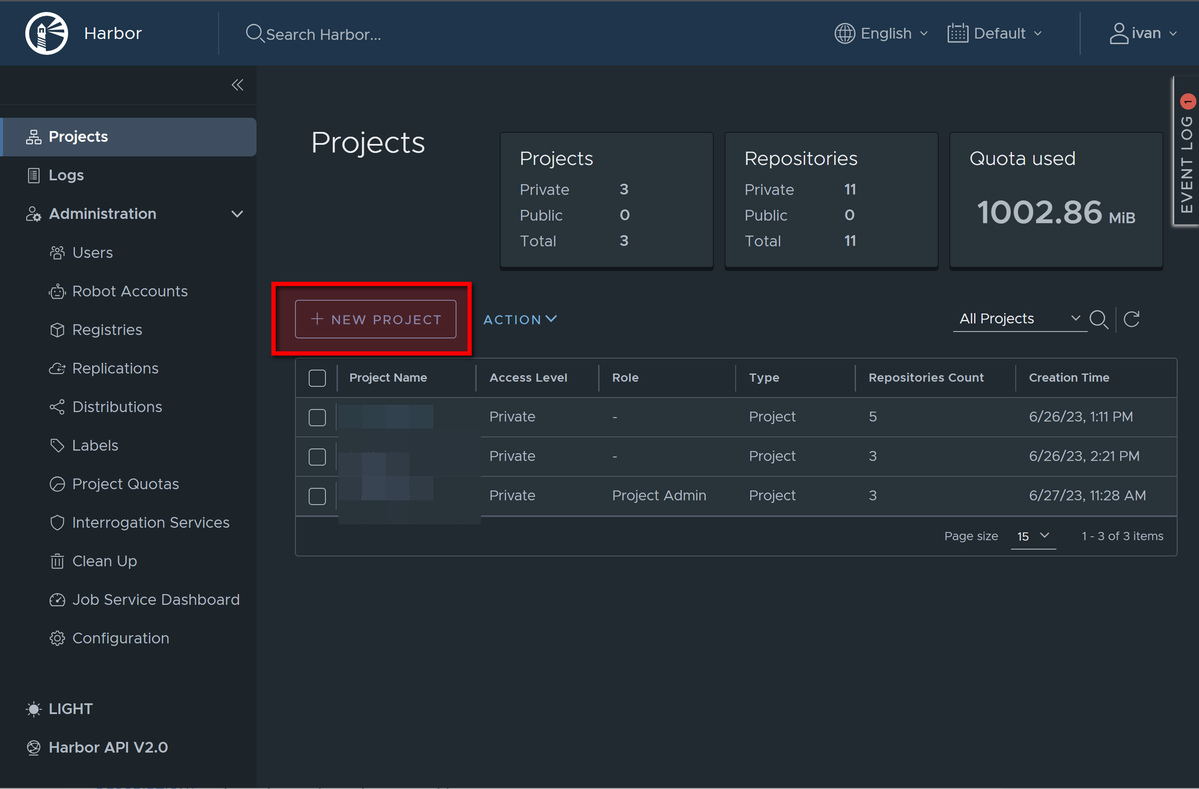
And add new project:
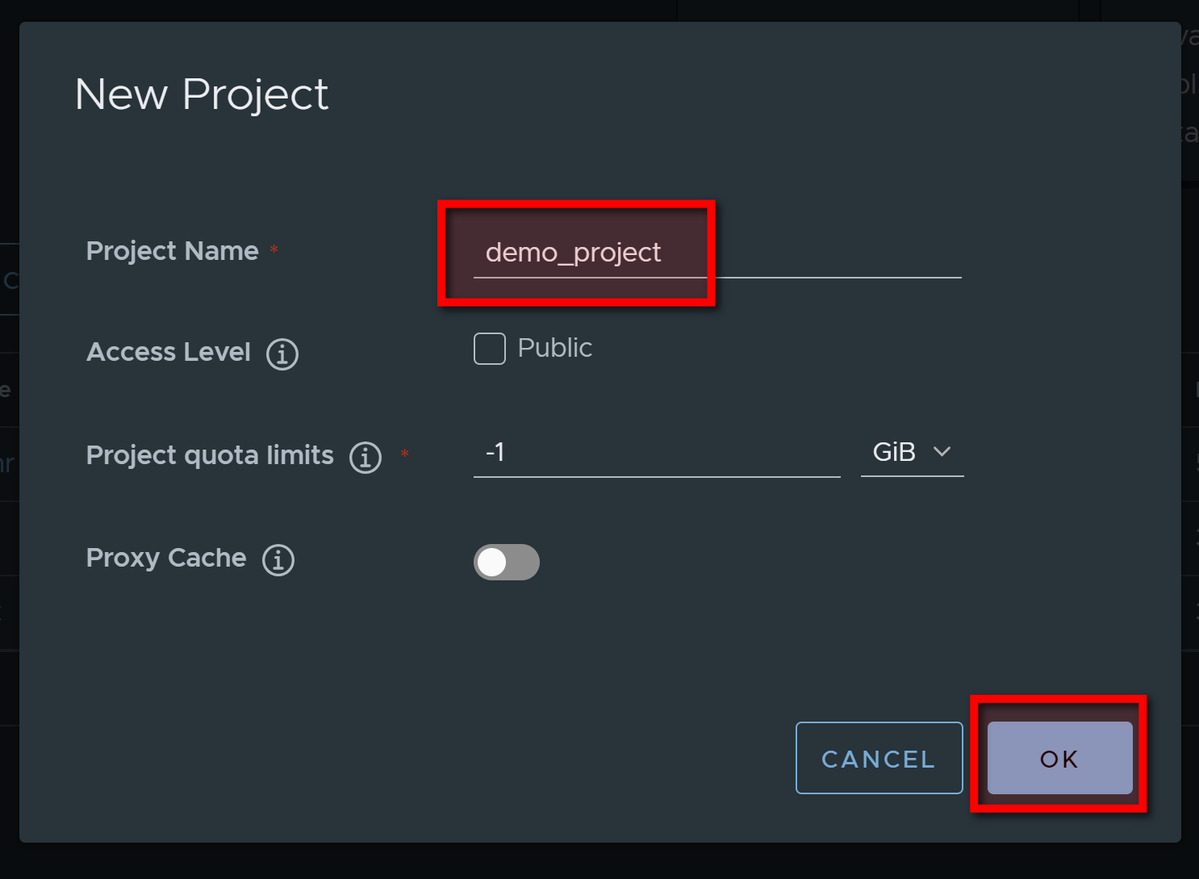
Enter project name and keep other parameters "as is":
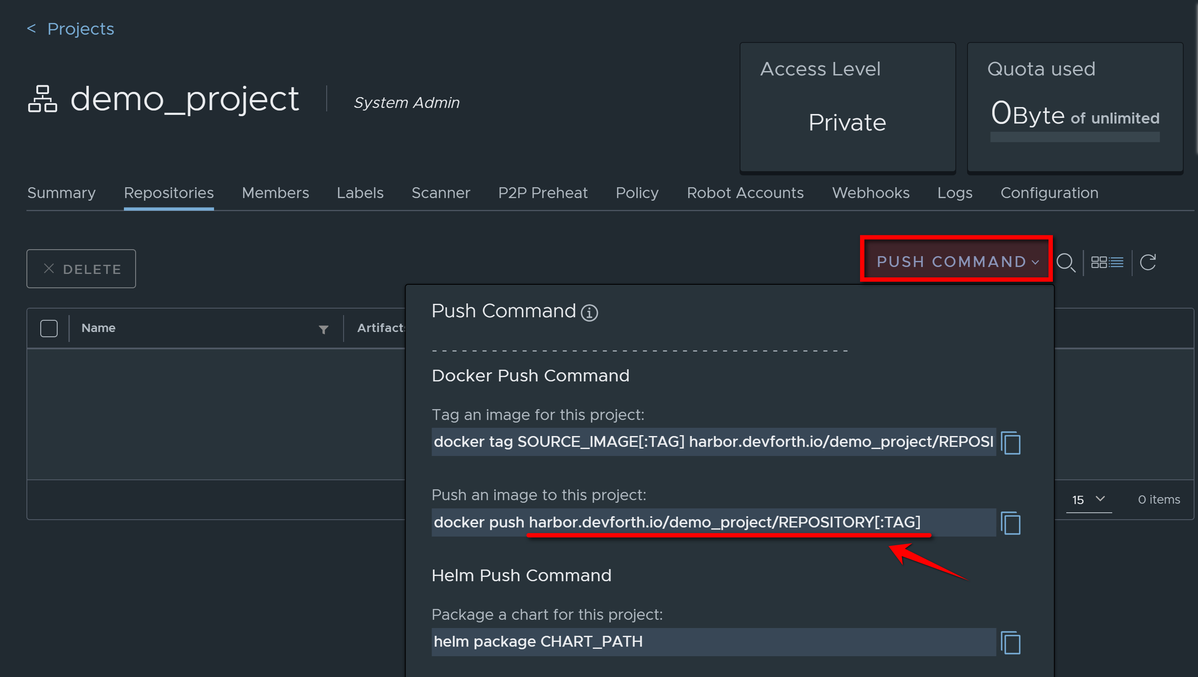
Go to project, and click on PUSH COMMAND to get registry base URL:
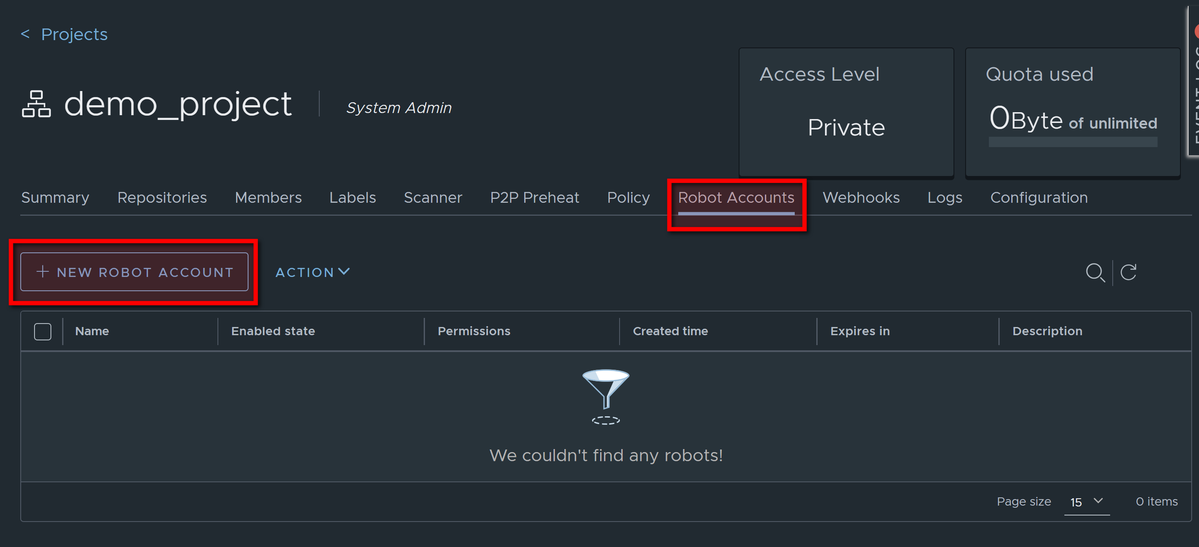
Go to Robot Accounts and click NEW ROBOT ACCOUNT
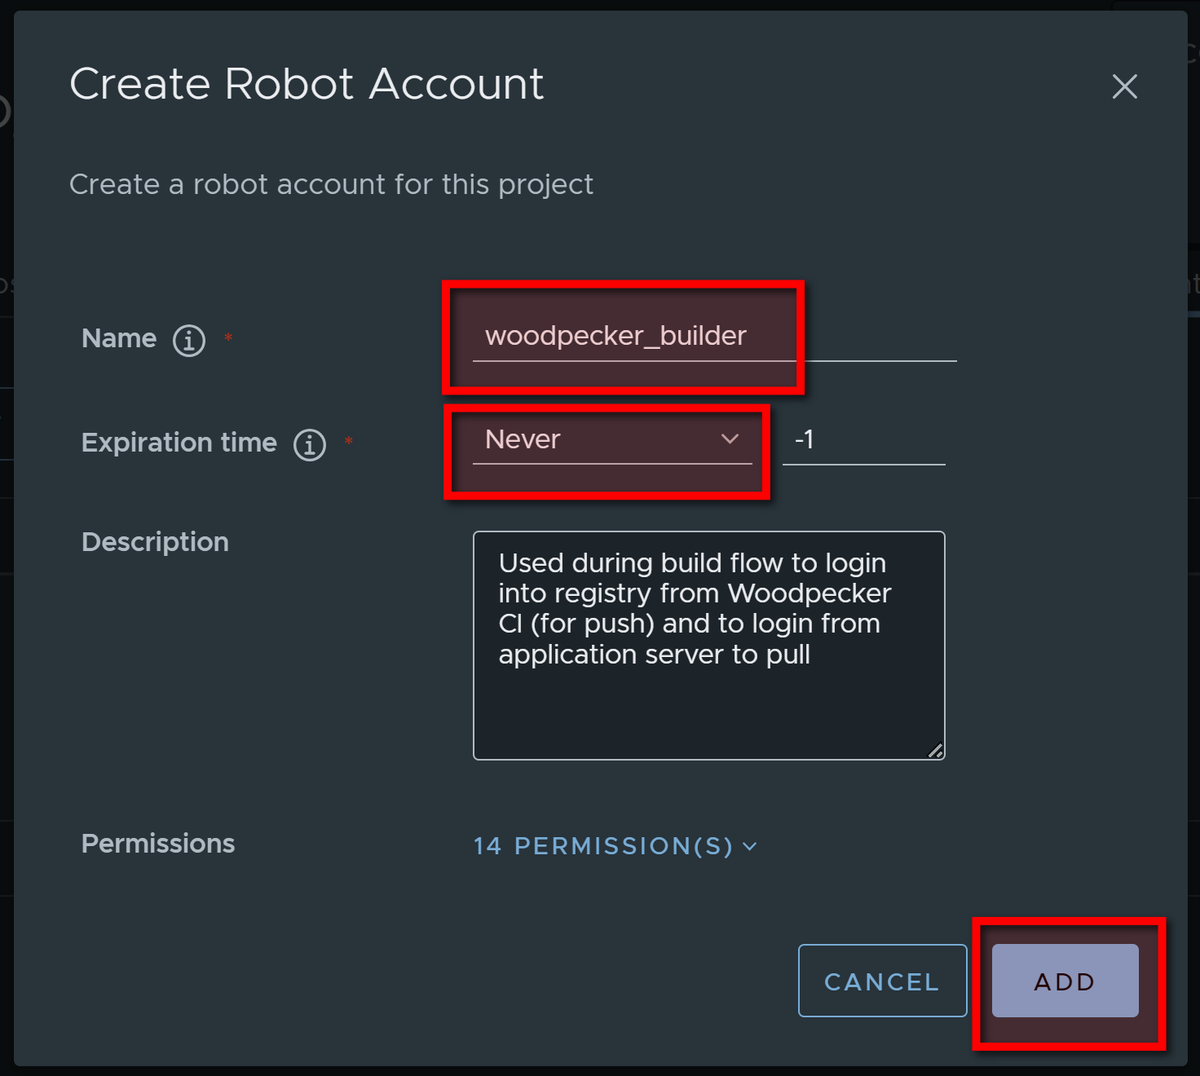
Specify name of robot account and set expiry, optionally add description:
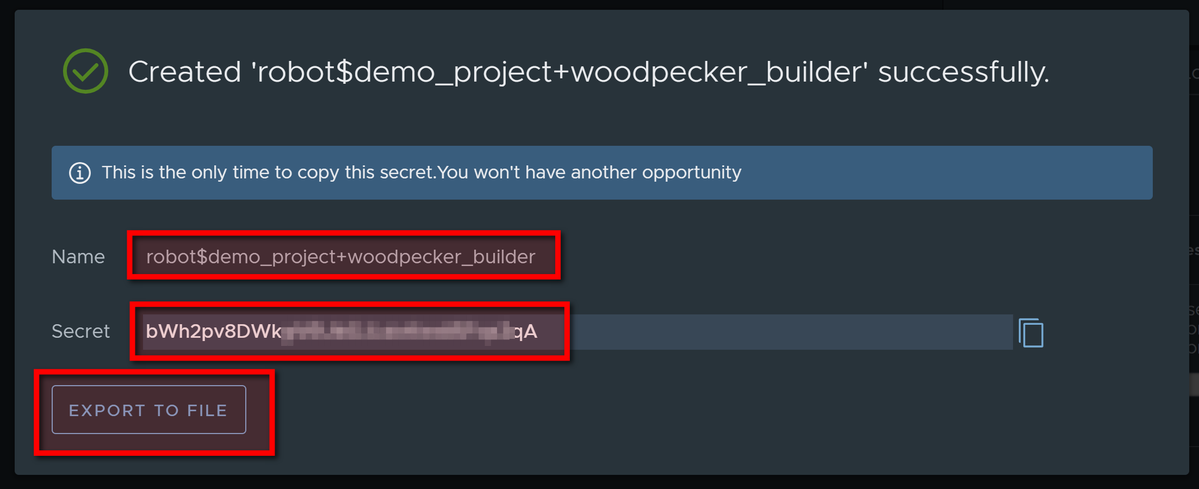
Remember name and password of Robot account or export to file:
Prepare Application server
For most our projects we use Amazon EC2 VPS with latest Ubuntu version, though.
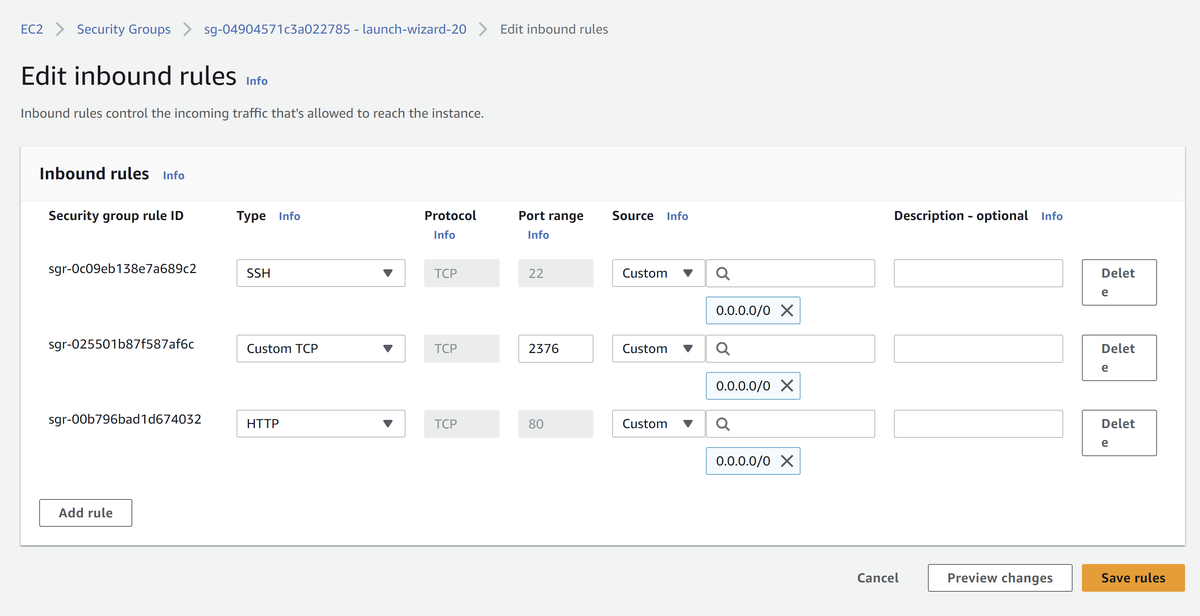
What is important that you need to have next ports open on your VPS server:
- TCP 22 we need it for the SSH connection to configure the server
- TCP 2376 - Dedicated port for our secure Docker connection, we will use port
- All ports that your application are listening on (e.g. TCP 80, TCP 443)
Some VPS providers have all ports open by default and no ability to open them, but for AWS EC2 all ports are closed by default. To open them use Security Group configuration:

There you can click Edit inbound rules and open ports using the form:
First time you need to connect to server manually:
On Amazon EC2 login as ubuntu.pem
ssh -i ~/xx.pem ubuntu@xxxxx
Then switch to root mode for convenience:
sudo bash
First of all install docker:
apt update && apt install docker.io
Then create set of certificates which we will use to securely deploy containers from build server:
curl -s -L https://raw.githubusercontent.com/devforth/docker-tls-generator/main/generate-tls.sh | bash
Feel free to see what this script does before blindly run it.
Certificates should be generated now (3 files in ~/.docker directory), and we will use them in the next section, so don't close SSH connection yet.
Setup CI server project
Go to:
https://woodpecker.yourdomain.com/
and activate repository by clicking Add repository, then Reload repositories, then Enable:

Now go to settings:

Set Trusted checkbox:
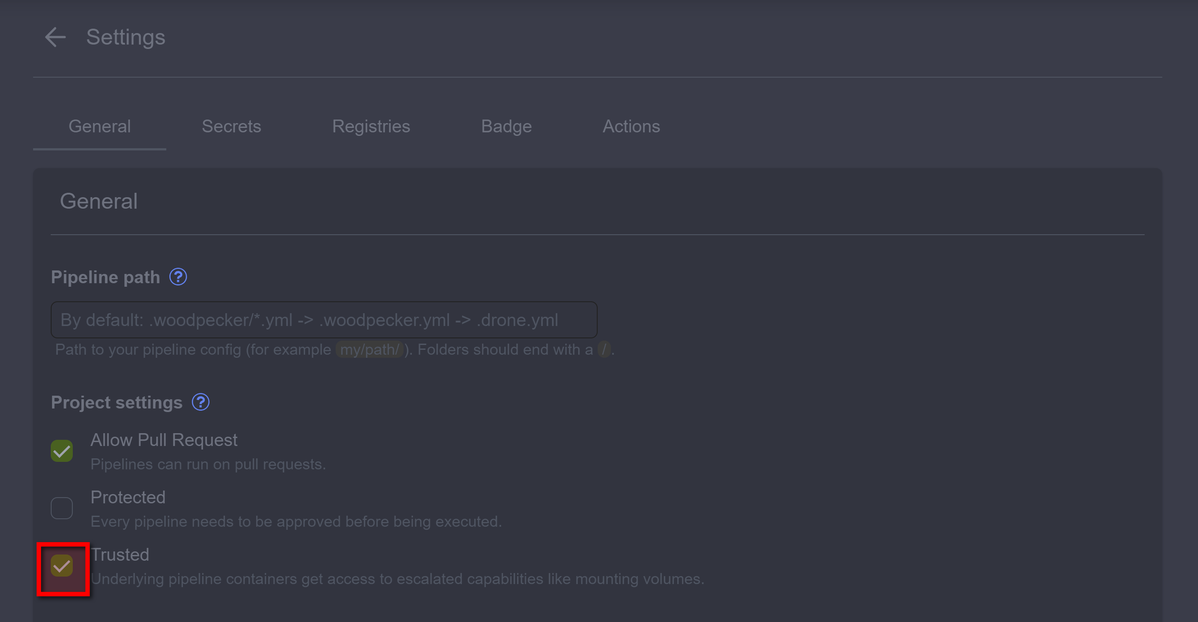
If you do not see Trusted or you cannot activate it, check the Woodpecker server setup (or contact a member of your team who installed Woodpecker)
Now go to Secrets. We will add secrets for every certificate generated on server and Harbor secret:

Now, on the server where you created the certificates, you must open each certificate in the folder. ~/.docker
For example, we add ca.pem to woodpecker secrets
cat ~/.docker/ca.pem
And copy our key AS IS (no new lines, no breaks, just copy it), then create a name and paste our ca.pem
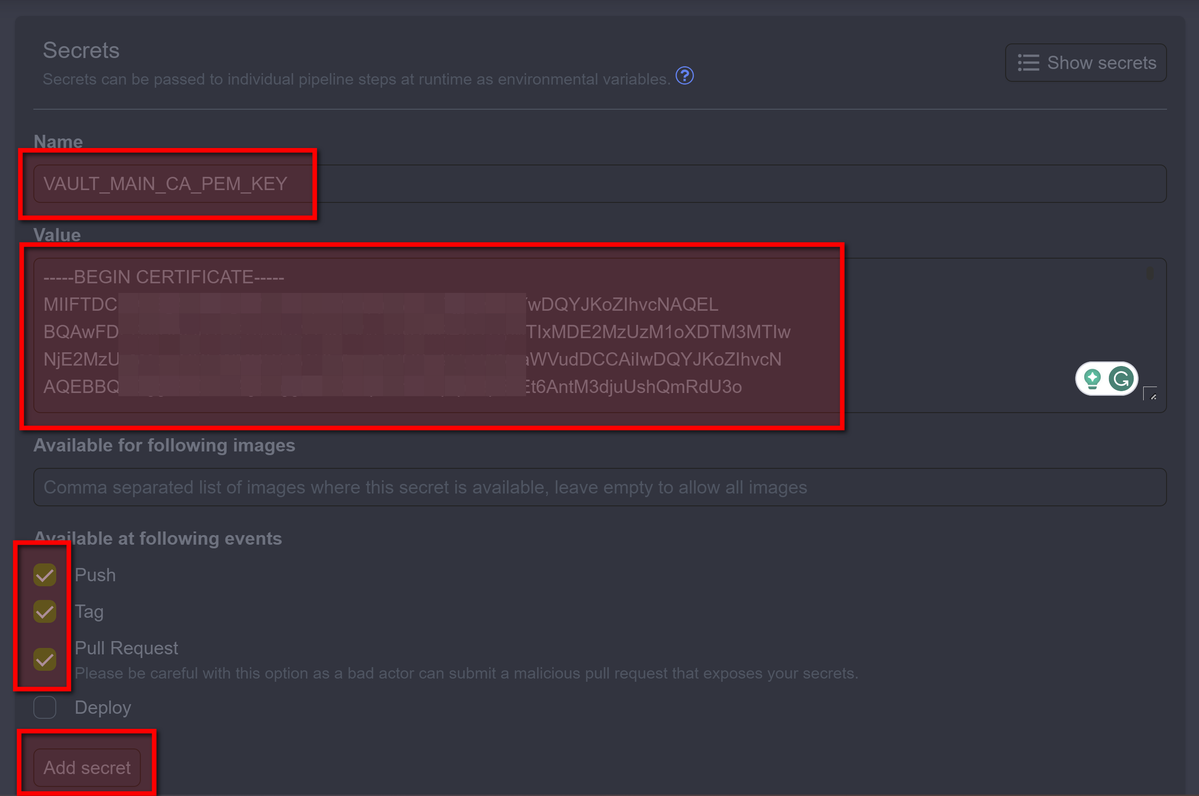
It needs to be repeated with the keys:
- Secret name:
VAULT_MAIN_CA_PEM_KEY. Secret Valuecat ~/.docker/ca.pem - Secret name:
VAULT_MAIN_KEY_PEM_KEY. Secret Valuecat ~/.docker/key.pem - Secret name:
VAULT_MAIN_CERT_PEM_KEY. Secret Valuecat ~/.docker/cert.pem - Secret name
VAULT_HARBOR_KEY. Secret Value you got from Harbor UI
Deployment pipeline setup
Create a folder .woodpecker in the root of your repository and file .deploy.yml
branches: [main]
clone:  git:
    image: woodpeckerci/plugin-git    settings:      partial: false      depth: 5
pipeline:  build:    image: docker:git    volumes:      - /var/run/docker.sock:/var/run/docker.sock    commands:      - cd deploy      - /bin/sh -x deploy.sh
    secrets:       # ⚠️ !If you will add new secrets into vault, don't forget list them here
      - VAULT_MAIN_CA_PEM_KEY      - VAULT_MAIN_KEY_PEM_KEY      - VAULT_MAIN_CERT_PEM_KEY      - VAULT_HARBOR_KEY
No create folder deploy in root of your repository and file deploy.sh:
#!/bin/bash

# Pay attention: # ⚠️ !We use the username given to us at the Harbor credentials screen# ⚠️ !We use the base repository URL given to us at the Harbor (if you want, you can just use hostname)
HARBOR_USERNAME='robot$demo_project+woodpecker_builder'
HARBOR_REGISTRY_BASE_URL=harbor.devforth.io/demo_project/

set -e

branch=$CI_COMMIT_BRANCH
if [ -z "$branch" ]; then
  branch=$(git branch | grep \* | cut -d ' ' -f2)
fi

echo "Building branch $branch"

mkdir -p ~/.docker/

if [ "$branch" = "main" ]; then
  echo "$VAULT_MAIN_CA_PEM_KEY" > ~/.docker/ca.pem
  echo "$VAULT_MAIN_KEY_PEM_KEY" > ~/.docker/key.pem
  echo "$VAULT_MAIN_CERT_PEM_KEY" > ~/.docker/cert.pem  # ⚠️ !don't forget to set your IP:
  HOST_DOMAIN=<PUBLIC IP OF YOUR SERVER>
else  # feel free to add mo branches for Sandbox/QA/UAT here
  echo "No configuration for branch $branch"
  exit 255
fi


docker login -u $HARBOR_USERNAME -p $VAULT_HARBOR_KEY $HARBOR_REGISTRY_BASE_URL

docker compose -p stack-$branch -f docker-compose.yml -f env/$branch.yml build
docker compose -p stack-$branch -f docker-compose.yml -f env/$branch.yml push

# Activate remote Docker contest on the Application server (so all next docker commands executed on the server)
export DOCKER_HOST=tcp://$HOST_DOMAIN:2376
export DOCKER_TLS_VERIFY=1
export DOCKER_CERT_PATH=~/.docker

docker login -u $HARBOR_USERNAME -p $VAULT_HARBOR_KEY $HARBOR_REGISTRY_BASE_URL

docker compose -p stack-2-$branch -f docker-compose.yml -f env/$branch.yml up -d --pull always --remove-orphans --wait

# cleanup
docker 2>/dev/null 1>&2 rmi $(docker images -f "dangling=true" -q) || true
Also create docker-compose.yml file in deploy directory:
version: '3'
services:
    gate:
        image: strm/nginx-balancer
        container_name: load-balancer
        ports:
            - "80:8080"
        environment:
            - "NODES=web1:80 web2:80"
    web1:
        image: strm/helloworld-http
    web2:
        image: strm/helloworld-http
Add messages about build start/finish to Slack
Allow your QAs to know about builds by integrating any communication channel. For Slack you can even use plugin:
Add into pipeline section (on the same level where build) before build to .woodpecker.yml
pipeline:
slack-begin:
image: plugins/slack
secrets:
- SLACK_WEBHOOK
webhook: $SLACK_WEBHOOK
username: Woodpecker Builder 👷♂️
icon_url: ${CI_COMMIT_AUTHOR_AVATAR}
template: >
{{repo.name}}/{{build.branch}} - Started #{{build.number}} "${DRONE_COMMIT_MESSAGE}" by {{build.author}} "${DRONE_COMMIT_AUTHOR} (${DRONE_COMMIT_AUTHOR_EMAIL})" (<{{build.link}}|Open>)
build:
...
Add Slack webhook app, select the desired channel, and paste the final webhook into SLACK_WEBHOOK secret.
Add after build:
build:
...
slack-end:
image: plugins/slack
secrets:
- SLACK_WEBHOOK
webhook: $SLACK_WEBHOOK
username: Woodpecker Builder 👷♂️
icon_url: ${CI_COMMIT_AUTHOR_AVATAR}
template: >
{{repo.name}}/{{build.branch}} 🏗️ #{{build.number}} {{uppercasefirst build.status}} after {{since build.started}} (<{{build.link}}|Open>)
when:
status:
- success
- failure
Recommendations and best practices
- Use Secrets Vault for all sensitive tokens in your setup: API tokens, cryptographic keys, and passwords from the database. This will eliminate the risks of leaking them through the repository. At the same time, don't add Secrets for insensitive public info because it makes configuration challenging: for example, we define Harbor username in a simple environment variable in the deploy script because there is no risk of it will be leaked. At the same time, we keep our secret vault list compact and manageable in multiple environments
- For multi-environment setup, prefer using separate VPS/dedicated servers and keep all domain structure on Path-based setup:
/api/bo/docs. This will allow us to introduce e.g., easilydeb.yourdomain.comorstage.yourdomain.comjust by adding one record into the DNS system without additional rerouting with keeping all stack uniform. - Use latest version of docker.io which has nested compose. Don't use legacy docker-compose (with dash)
- For micro-services architecture use Docker Swarm or Kubernetes.

